Good machine embroidery quality is more than an attractive design at the moment the machine stops. The stitches should form the intended shapes evenly, outlines should register with fills, the fabric should remain flat, and the finished item should retain its appearance after the stabilizer is trimmed, the item is worn and it is washed. The stitch-out should also run without repeated thread breaks, skipped stitches, loops or bird's nests.
Evaluate embroidery at three stages: while it is still in the hoop, after it is removed from the hoop, and after the intended care cycle. A design can look flat under hoop tension and pucker as soon as the fabric is released. It can also appear perfect before washing but distort after the fabric shrinks or the wrong stabilizer loses support.
Updated July 28, 2026, by Ludmila Konovalova, machine embroidery designer and founder of Royal Present Embroidery. The recommendations are based on professional digitizing, test stitching and practical use of machine embroidery files.
Quick machine embroidery quality checklist
- shapes and proportions match the intended artwork;
- outlines and small details register with the fills;
- coverage suits the technique, with no unintended gaps;
- the fabric has no puckers, folds or waves around the design;
- bobbin thread does not show on the front;
- there are no skipped stitches, loose loops, repeated breaks or bird's nests;
- tie-ins and tie-offs secure the beginning and end of each object;
- the back is appropriate for the purpose of the item;
- the embroidery is not unnecessarily stiff or bulky;
- the result remains stable after washing and normal use.
Shop Machine Embroidery Designs
What determines machine embroidery quality?
The finished result is produced by five connected factors. A fault in any one of them can look like a problem in another.
- Digitizing: underlay, density, stitch length and direction, pull compensation, object sequence, tie stitches, travel paths and trims.
- Fabric and stabilization: stretch, weight, nap, grain direction, the type and weight of backing, and whether a topping is required.
- Needle and thread: needle system, size, point and condition, eye size, upper thread, and bobbin thread.
- Embroidery machine: correct threading, tension, bobbin case condition, a clean hook area, unobstructed thread path and suitable speed.
- Hooping and operation: hoop size, secure placement, fabric tension, stabilizer position, free hoop movement and a proper test stitch-out.
Calling a file bad before testing it on stable fabric under controlled conditions is not a diagnosis. At the same time, adding more backing cannot permanently correct faulty stitch sequencing, excessive layering or inadequate pull compensation. Troubleshooting must separate the design, materials, machine and operator variables.
Machine embroidery defects: causes and first checks
| Check | Quality result | Common causes of defects | Check first |
|---|---|---|---|
| Coverage | Fills look even and match the intended technique. | Nap, missing topping, unsuitable thread, incorrect density or underlay. | Test on smooth, stable fabric using the intended thread weight. |
| Registration | Outlines sit at the edges of fills without visible displacement. | Fabric movement, weak stabilization, hoop play, excessive speed, sequencing or compensation. | Hooping, backing, free hoop movement and whether the shift repeats in the same place. |
| Shape | Circles remain round and proportions remain accurate. | Push and pull, stretched fabric, weak backing or unsuitable stitch direction. | Compare the design in the hoop and after release, then make a controlled test. |
| Fabric surface | No puckers or waves appear after unhooping. | Overstretched fabric, insufficient support, excessive density or an oversized hoop. | Use the smallest suitable hoop and do not pull the fabric after tightening it. |
| Thread tension | No bobbin thread, loose loops or collapsed upper thread shows on the front. | Incorrect threading, lint, unsuitable bobbin, damaged needle or mismatched needle and thread. | Rethread both paths correctly and install a new needle before adjusting tension. |
| Breaks and skips | The design runs without systematic stops. | Needle damage, burrs, poor thread path, speed, short stitches or excessive layering. | Record the position and determine whether the fault repeats at the same coordinate. |
| Back of work | No nests, unsecured ends or unnecessary long jumps. | Incorrect threading, presser foot position, faulty tie stitches or inefficient routing. | Inspect the beginning of the failed object and the complete upper thread path. |
| Hand and flexibility | The stiffness is suitable for the finished item. | Too many fill layers, heavy underlay or a dense design used on lightweight fabric. | Evaluate overlapping layers, not only the total stitch count. |
| After washing | The item remains flat and the design keeps its shape and registration. | Fabric shrinkage, removed permanent support, weak backing or unsuitable care. | Prewash shrink-prone fabric and test the complete care cycle. |
What does high-quality machine embroidery look like?
Even coverage without unintended gaps
Fabric should not show randomly through a conventional solid fill. However, visible ground fabric is not automatically a defect. Open areas may be intentional in sketch, watercolor, vintage, shading and hand-stitch-inspired techniques. Judge density against the design method, not by the rule that more stitches are always better.
On terry cloth, fleece and velvet, stitches can sink into the nap. A lightweight water-soluble topping holds the fibers down and improves edge definition. Topping does not replace the backing underneath and cannot correct unsuitable density in the file.
Accurate registration of fills, outlines and details
A displaced outline is not caused only by machine speed. Stitches contract the fabric across their width and can displace it along the stitch direction. This physical movement is commonly described as push and pull. A digitizer manages it with suitable underlay, stitch angles, object sequence and pull compensation. The embroiderer must provide stable hooping, suitable backing and unobstructed hoop travel.
If the displacement changes between stitch-outs, inspect the fabric, stabilizer, hoop and machine first. If the same fault repeats in exactly the same part of the design on stable fabric under identical conditions, the object sequence or digitizing is a more likely cause.
Flat fabric without puckering
Fabric must be smooth and secure in the hoop, but it should not be stretched like a drum. Stretched fabric returns toward its original dimensions after unhooping while the embroidered area cannot. The result is puckering, ripples or distorted shapes around the design.
Use the smallest hoop that safely accommodates the file. Select backing according to fabric stretch, design density, the purpose of the item and the intended care method—not simply according to fabric thickness.
Balanced upper and bobbin thread tension
Bobbin thread should not appear on the front, and the upper thread should not form loose loops. On the back of a standard satin-column tension test, embroiderers often look for approximately one-third bobbin thread in the center with upper thread at both sides. This is a diagnostic reference, not a universal rule for every stitch type, thread and machine.
Before changing tension settings, install a new needle, raise the presser foot and completely rethread the upper path, check the bobbin, and clean the hook area. Otherwise a tension adjustment may merely hide faulty threading or lint buildup.
A clean and functional back
A clean back does not require the absolute absence of travel stitches. Acceptable jumps depend on the equipment, trim commands and design logic. The important criteria are secure starts and finishes, no tangled nests, and suitability for the way the item will be used.
For clothing worn directly against the skin, particularly children's garments, the finished back can be covered with a soft fusible embroidery backing. This protects the skin from rough stabilizer and stitches; it does not repair incorrect thread tension.
How to assess the quality of an embroidery file
A machine embroidery file cannot be judged by an attractive preview or stitch count alone. The internal construction of the design matters more.
- Underlay suits the object and material. It anchors the fabric, supports the top stitches and helps preserve the intended shape.
- Density suits the technique. Excessive density increases friction, makes embroidery stiff and may damage the fabric.
- Pull compensation is appropriate. It helps the edges of fills and satin columns reach their intended boundaries after stitch contraction.
- Stitch directions describe the form. Angles create dimension and distribute stress rather than simply filling an area.
- Object sequence is logical. Backgrounds, details and outlines stitch in an order that protects registration.
- Tie stitches and trims are intentional. Threads remain secure without creating hard knots from excessive penetrations.
- There are no dangerous short stitches or unnecessary overlaps. Both can increase thread breaks, needle breaks and fabric perforation.
- Travel paths are efficient without damaging the sequence. Fewer color changes are useful only when combining objects does not compromise the technology.
Leather and faux leather require particular care because every needle penetration remains in the material. Excessive density, repeated penetrations on the same line or clusters of very short stitches can perforate the surface and cut out part of the design.
Long hand-stitch style: why it needs different settings
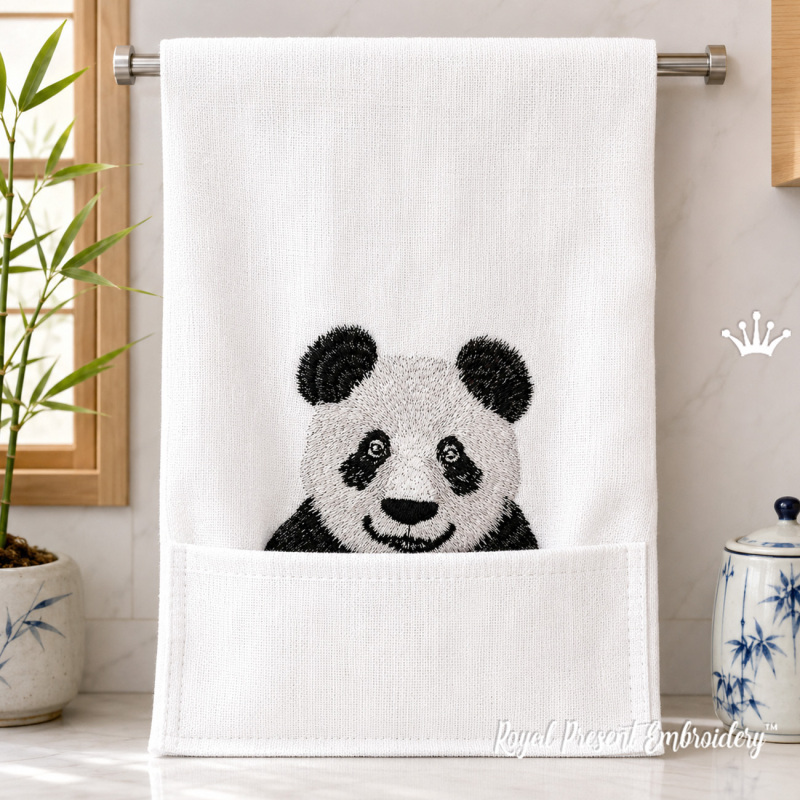
Not every embroidery design should be judged by the standards of a dense conventional fill. The Pocket Panda Machine Embroidery Design uses open, directional stitches to imitate hand embroidery. The longer stitches create the flow of the fur and the lively character of the image. They are intentional and should not be converted into a solid fill.
Size: 83.2x93.4 mm (3.28x3.68 "), Stitches: 16773, Colors: 5. The design is intended for 120/2 machine embroidery thread and requires cut-away backing selected for the garment fabric.
Reduce speed from the machine's normal maximum when stitching long, exposed stitches. The correct setting depends on the machine, needle, thread and fabric. Excessive hoop acceleration can increase vibration, interfere with the placement of long stitches and raise the risk of thread breaks.
Step-by-step troubleshooting: machine, materials or design?
Change only one variable at a time and label every test sample. If you replace the needle, thread, backing and speed while also adjusting tension, you will not know which change corrected the fault.
- Install a new needle of the correct system, size and point. A 75/11 embroidery needle is a common starting point for standard 40-weight embroidery thread on medium-weight woven fabric, but the fabric and thread determine the final choice.
- Rethread the machine completely. Raise the presser foot, check every upper thread guide, verify bobbin orientation and inspect the bobbin case.
- Clean the thread path and hook area. Lint and fragments of thread alter the actual tension.
- Check the thread and spool delivery. Make sure the spool cap, cone stand or thread net does not restrict the thread or allow it to catch.
- Inspect hooping. The fabric must be secure but not stretched. The hoop should clear the machine, garment and table throughout the design area.
- Match stabilizer to the project. Consider stretch, design density, garment use and washing. Use topping on napped fabric when needed.
- Reduce speed when the technique requires it. Metallic, specialty and long-stitch designs often benefit from slower stitching, but speed is not a universal cure for registration faults.
- Test the file on stable woven fabric. Use a fresh needle, standard embroidery thread and appropriate cut-away backing to create a useful control sample.
- Record whether the fault repeats. A break or displacement that consistently occurs at the same coordinate points toward a design, stitch-length or layering problem.
Common mistakes that hide the real cause
- Increasing density whenever fabric shows. This can make embroidery rigid and increase puckering without correcting the real problem.
- Tightening the hoop after the fabric is inserted. Pulling at the edges stretches the fabric and often creates waves after release.
- Changing tension before rethreading. Incorrect threading is then compensated with an incorrect setting.
- Using water-soluble topping as the only support. Topping controls the surface; it does not provide permanent structural support.
- Testing on different materials every time. Without a control fabric, the design and material variables cannot be separated.
- Resizing a stitch file substantially in the machine. Scaling can alter density, stitch length, compensation and registration.
- Sorting colors automatically. Changing the digitized sequence may place outlines too early or disturb the intended layering.
How to test a machine embroidery design professionally
A useful test stitch-out records the machine, file format, exact design size, fabric, backing, topping, needle, upper and bobbin threads, speed, tension changes and any stops. Mark the sample before removing it from the hoop.
Inspect the result in the hoop, immediately after unhooping, and after the intended washing and drying cycle. Look at it under normal viewing light rather than only through magnification. Photography can reveal registration and puckering clearly, but strong side lighting may exaggerate harmless surface texture.
When comparing two tests, change one condition only. This simple method is slower than random adjustment for the first few minutes and much faster over the complete project because it identifies the actual cause.
Frequently asked questions
Why is my machine embroidery puckering?
Common causes are fabric stretched during hooping, insufficient or unsuitable backing, a hoop larger than necessary, fabric shrinkage, and excessive stitch density. Compare the work before and after unhooping and test the file on stable woven fabric.
Why does the outline not match the fill?
Registration errors can result from fabric movement, weak stabilization, loose hooping, obstructed hoop travel, excessive speed, incorrect object order or inadequate pull compensation. A defect that repeats at the same coordinate under controlled conditions is more likely to be in the file.
Why is bobbin thread showing on top?
First rethread the upper path with the presser foot raised, verify the bobbin and clean the hook area. Check the needle and thread path before changing tension. Bobbin thread on top does not automatically mean that bobbin tension is too tight.
Does visible fabric always mean the design is too light?
No. Open fabric can be intentional in sketch, shading and hand-stitch-style designs. On terry cloth or fleece, the stitches may be sinking into the nap and require water-soluble topping rather than more density.
Should the back of machine embroidery be perfectly clean?
It should be secure, functional and free from nests and unnecessary long jumps. A few planned travel stitches may be normal. For garments worn against the skin, add a soft protective backing after embroidery if needed.
Can slowing the machine fix poor registration?
Sometimes slower stitching reduces vibration or improves the handling of specialty threads and long stitches. It cannot correct weak stabilization, stretched fabric, hoop movement, faulty sequence or inadequate pull compensation.
How can I tell whether the problem is in the embroidery file?
Make a control stitch-out on stable woven fabric with suitable cut-away backing, standard thread and a new needle. If the same defect repeats in the same location after machine and threading checks, the file is a likely cause.
Can I resize an embroidery design on the machine?
Small adjustments may be supported by some machines, but substantial resizing can change density, stitch length, compensation and registration. Use a professionally digitized size whenever possible.
Final quality-control checklist
- Confirm that the exact file size fits the machine's real embroidery field.
- Print or display the template at 100% scale and verify placement.
- Use the correct needle, thread and stabilizer for the fabric and technique.
- Hoop securely without stretching the fabric.
- Trace the design boundary before starting.
- Do not reorder colors or substantially resize the stitch file.
- Make a complete test using the same materials as the final item.
- Inspect the stitch-out in the hoop, after release and after washing.
- Save notes with the test sample so the successful setup can be repeated.
High-quality machine embroidery is the result of a well-digitized file, compatible materials, correct machine preparation and controlled testing. When a defect appears, work through the system in a fixed order instead of changing several settings at once. This turns troubleshooting from guesswork into a repeatable professional process.
Author: Ludmila Konovalova, Royal Present Embroidery.

Author: Ludmila Konovalova
My name is Ludmila Konovalova, and I lead Royal Present Embroidery. Embroidery for me is more than a profession; it is a legacy of my Ukrainian and Bulgarian heritage, where every woman in my family was a virtuoso in cross-stitch and smooth stitching. This art, passed down through generations, is part of my soul and a symbol of national pride.
Date: 01.02.2026

 Get Sign-In Link
 Login with Google
 Login with Facebook
 Login with Amazon
 Login with Paypal