By knowing the speed of your embroidery machine, you can find out how long it will take to embroider a design.
To use the embroidery calculator, click on the number of stitches in the product description.
Size: 33.9x28.3 mm (1.33x1.11 inches), Stitches: 1101
Size: 37.3x31.3 mm (1.47x1.23 inches), Stitches: 1221
Size: 40.9x34.4 mm (1.61x1.35 inches), Stitches: 1382
Size: 45.1x37.8 mm (1.78x1.49 inches), Stitches: 1539
Formats: .pes, .pec, .hus, .vip, .dst, .exp, .sew, .exp, .dat, .vp3, .jef
Here is a link to the freebies free machine embroidery designs download
The free designs in store are available for customers who purchased other designs, as a bonus.
You can add all free designs to the basket with a purchase not less than 3$. Sorry, separately, free without order designs cannot be loaded.
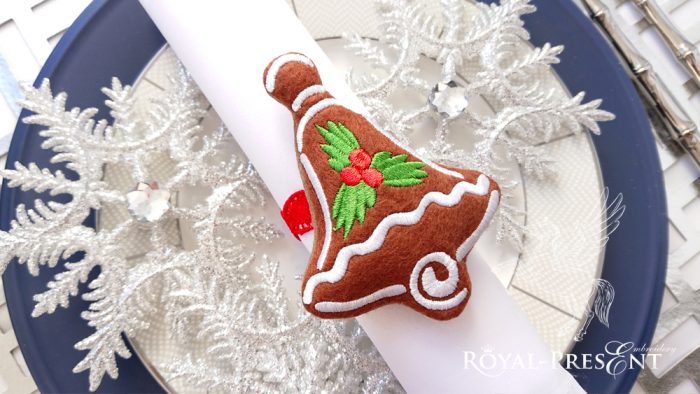
Tiny Holly Free Machine Embroidery Design for Satin
The Tiny Holly Free Machine Embroidery Design is a delightful addition to your embroidery projects, offering a festive touch with its intricate details. Part of the Yuletide Checked Teapot with Holly Set, this design comes in four sizes, perfectly suited for tiny hoops, making it ideal for embellishing small areas with precision.
Embroidering on Satin: A Detailed Guide
Satin, with its smooth and luxurious surface, offers a beautiful canvas for embroidery but requires special care to achieve the best results. The slippery nature of satin can make it a challenging fabric to work with, but with the right techniques, you can create stunning embroidery.
Choosing the Right Stabilizer:
- Self-Adhesive Tear-Away Stabilizer: Products like Sulky Sticky+, Gunold Filmoplast, and Madeira Cotton Fix are ideal for satin. These stabilizers provide a secure hold on the delicate fabric, preventing it from slipping during the embroidery process. They are also easily removable, ensuring the integrity of your design and fabric.
- Tear-Away Stabilizer: For lighter satin, using a regular tear-away stabilizer with a bit of temporary spray adhesive is a good alternative. It maintains the fabric’s drape while offering enough stability.
Embroidery Process:
- Hooping: Start by placing the satin on a non-slip surface, like a rubberized shelf liner, to prevent it from shifting. Smooth the fabric onto the sticky side of your stabilizer and hoop it carefully to avoid any ripples or bumps. Ensure that the fabric is taut and flat.
- Needle Selection: Use a 75/11 sharp needle or a size 11 embroidery needle, both of which will perforate the satin neatly, leaving tiny, clean holes that ensure a crisp and professional finish.
- Embroidering: Proceed with the embroidery, ensuring that the fabric remains taut within the hoop. The stabilizer will keep the satin in place, preventing any misalignment of the design.
- Finishing: Once the embroidery is complete, gently tear away the excess stabilizer, leaving your satin fabric with a flawless, delicate design.
Advanced Tips for Solid-Stitch Designs: For more intricate, solid-stitch designs on satin, consider using a crepe-backed satin and a cutaway stabilizer. This combination offers enhanced support during and after the embroidery, ensuring that the fabric doesn’t pucker and the stitches remain crisp.
FAQs: Embroidering on Satin
1. What type of stabilizer should I use for satin?
- For most satin fabrics, a self-adhesive tear-away stabilizer like Sulky Sticky+ or Gunold Filmoplast works best. If the design is heavier or more intricate, a cutaway stabilizer may be more appropriate.
2. Can I use any embroidery design on satin?
- While you can embroider most designs on satin, lighter designs like toile, redwork, or vintage are preferable for projects where fabric drape is important. Heavier designs are better suited for projects like pillows or handbags.
3. How do I prevent puckering when embroidering on satin?
- Proper stabilization is key. Using a sharp needle and ensuring the fabric is taut in the hoop will minimize puckering. For solid-stitch designs, using a cutaway stabilizer will provide the necessary support.
4. What needle should I use for satin embroidery?
- A 75/11 sharp needle or a size 11 embroidery needle is recommended for satin. These needles make small, precise perforations that result in a clean finish.
5. Can I use double-sided tape in the hoop to stabilize satin?
- Yes, adding double-sided tape to the inner hoop can provide extra grip on the slippery satin, helping to keep it in place during embroidery.
6. What should I do if the satin slips while embroidering?
- Re-hoop the fabric and ensure it is smooth and flat. Using a self-adhesive stabilizer or adding double-sided tape to the hoop can also help prevent slipping.
Embroidery on satin requires patience and precision, but the results are undeniably rewarding. By following these guidelines and using the Tiny Holly Free Machine Embroidery Design, you can create elegant and festive pieces that will add a touch of holiday cheer to any project.


 Get Sign-In Link
 Login with Google
 Login with Facebook
 Login with Amazon
 Login with Paypal