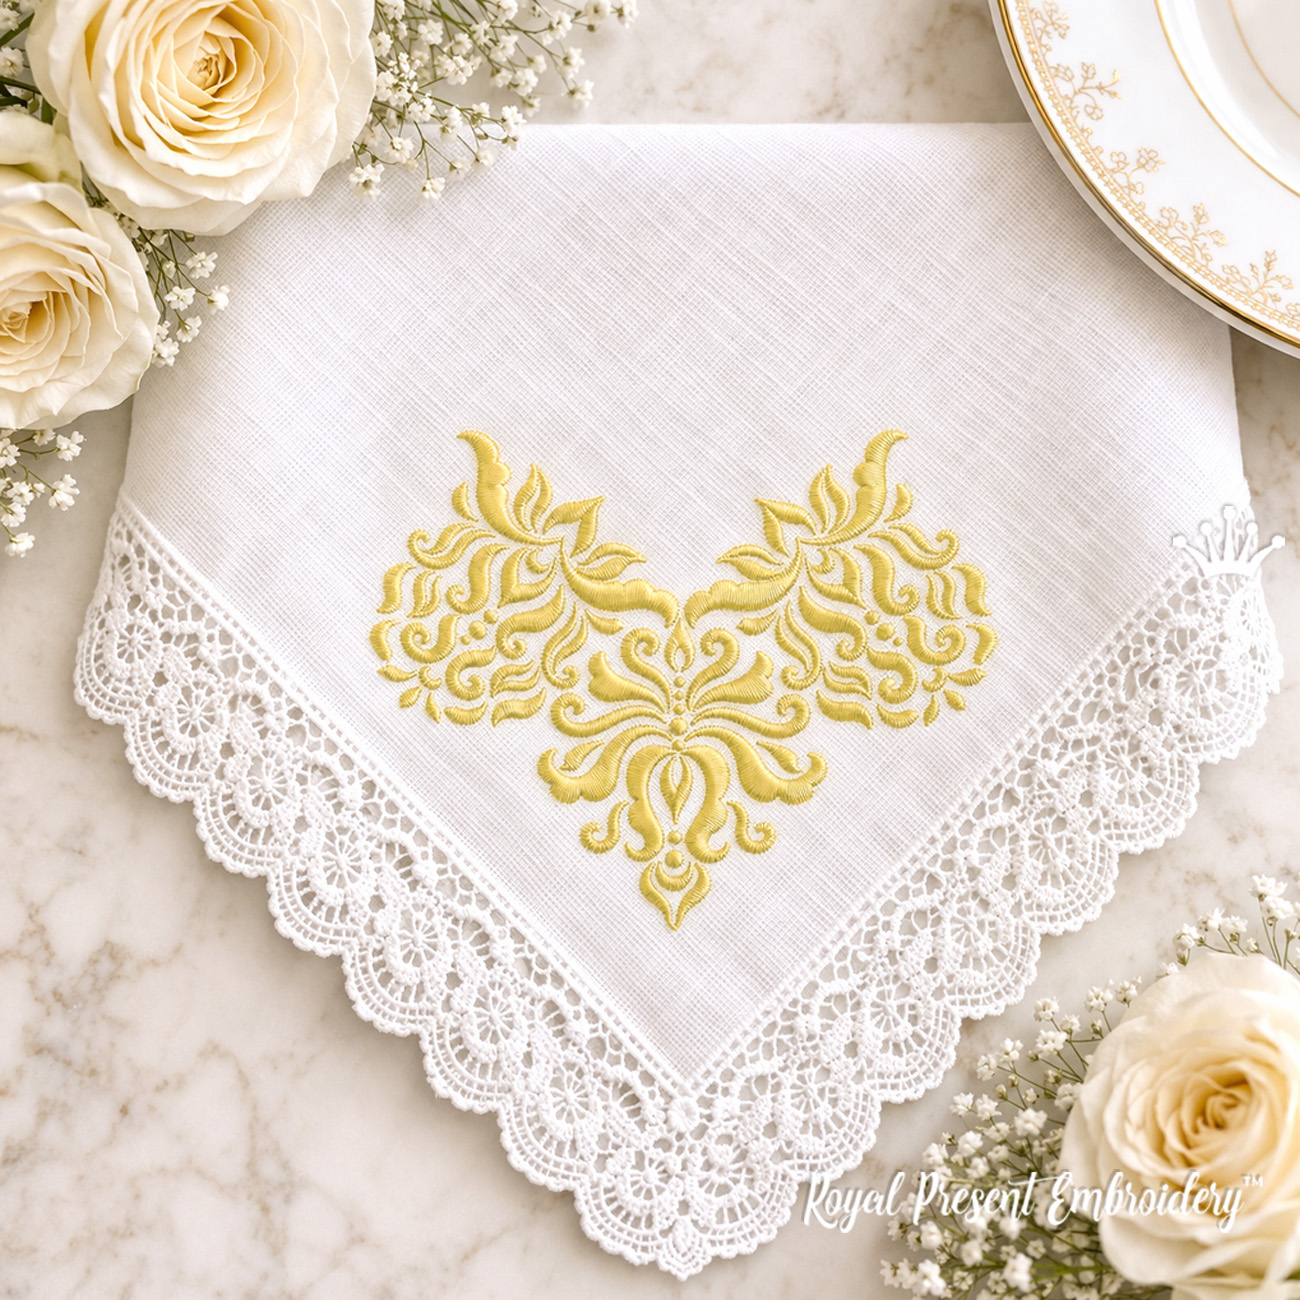
Machine embroidery on handkerchiefs is one of the most elegant ways to personalize fine linen, cotton or batiste fabric. A small corner design, tiny monogram frame or delicate white-on-white embroidery can turn a simple handkerchief into a wedding keepsake, baptism gift, heirloom accessory or thoughtful personalized present.
The secret is not only the embroidery design. A beautiful result depends on four things: the right stabilizer, accurate placement, careful hooping and suitable thread. In this guide, we explain how to embroider a handkerchief with a machine step by step, including stabilizer choice, corner placement, hooping options and finishing tips.
Quick answer: how do you machine embroider a handkerchief?
To machine embroider a handkerchief, choose a light and delicate design, mark the center and axis lines, stabilize the fabric with tear-away or self-adhesive tear-away stabilizer, add a water-soluble topping if needed, align the handkerchief in the hoop, stitch slowly and use matching bobbin thread if the reverse side will be visible.
For thin handkerchief fabric, avoid heavy stitch density and large filled designs. Small corner embroidery, monogram frames, tiny floral motifs and tone-on-tone designs usually work best.
Best machine embroidery designs for handkerchiefs
Handkerchiefs are small, delicate and often made from thin fabric. That means the embroidery design should be visually refined but not too heavy. A design that looks perfect on a towel may be too dense for a fine handkerchief.
The best design types for handkerchief embroidery are:
- small corner embroidery designs
- tiny monogram frames
- small initials or letters
- delicate floral elements
- tone-on-tone ornament designs
- white-on-white heirloom-style embroidery
- small border elements for one corner or one edge
If you want to personalize a handkerchief with initials, choose a frame that leaves enough open space for a letter or monogram. Our Mini Monogram Frames Machine Embroidery Design Bundle is a good option for small personalized projects because it includes six tiny frame designs in four sizes. The smallest height starts from 2.36 in / 6 cm, and the largest size fits a 100 × 100 mm hoop, also known as a 3.94 × 3.94 in or 4x4 hoop.
You can also browse more decorative options in our Monogram Frames machine embroidery designs collection.
What fabric is best for embroidered handkerchiefs?
Natural woven fabrics are the most suitable choice for handkerchief embroidery. Linen, cotton, cotton-linen blends and batiste are especially good because they hold stitches well and create a classic heirloom look.
For the cleanest result, choose fabric that is smooth, tightly woven and not too stretchy. Very loose fabric can shift during embroidery, and very thin fabric can show stabilizer marks or become distorted if the design is too dense.

Good fabrics for machine embroidered handkerchiefs
- fine linen
- cotton lawn
- batiste
- cotton-linen blend
- smooth lightweight woven cotton
Fabrics to use with caution
- very sheer fabric
- loose-weave linen
- stretch fabric
- slippery synthetic fabric
- fabric with heavy texture
Supplies you need
Before you start, prepare everything you need. Handkerchief embroidery is small work, and accuracy matters.
- handkerchief or fine linen fabric
- machine embroidery design suitable for thin fabric
- printed design template
- air-erase or water-soluble marking pen
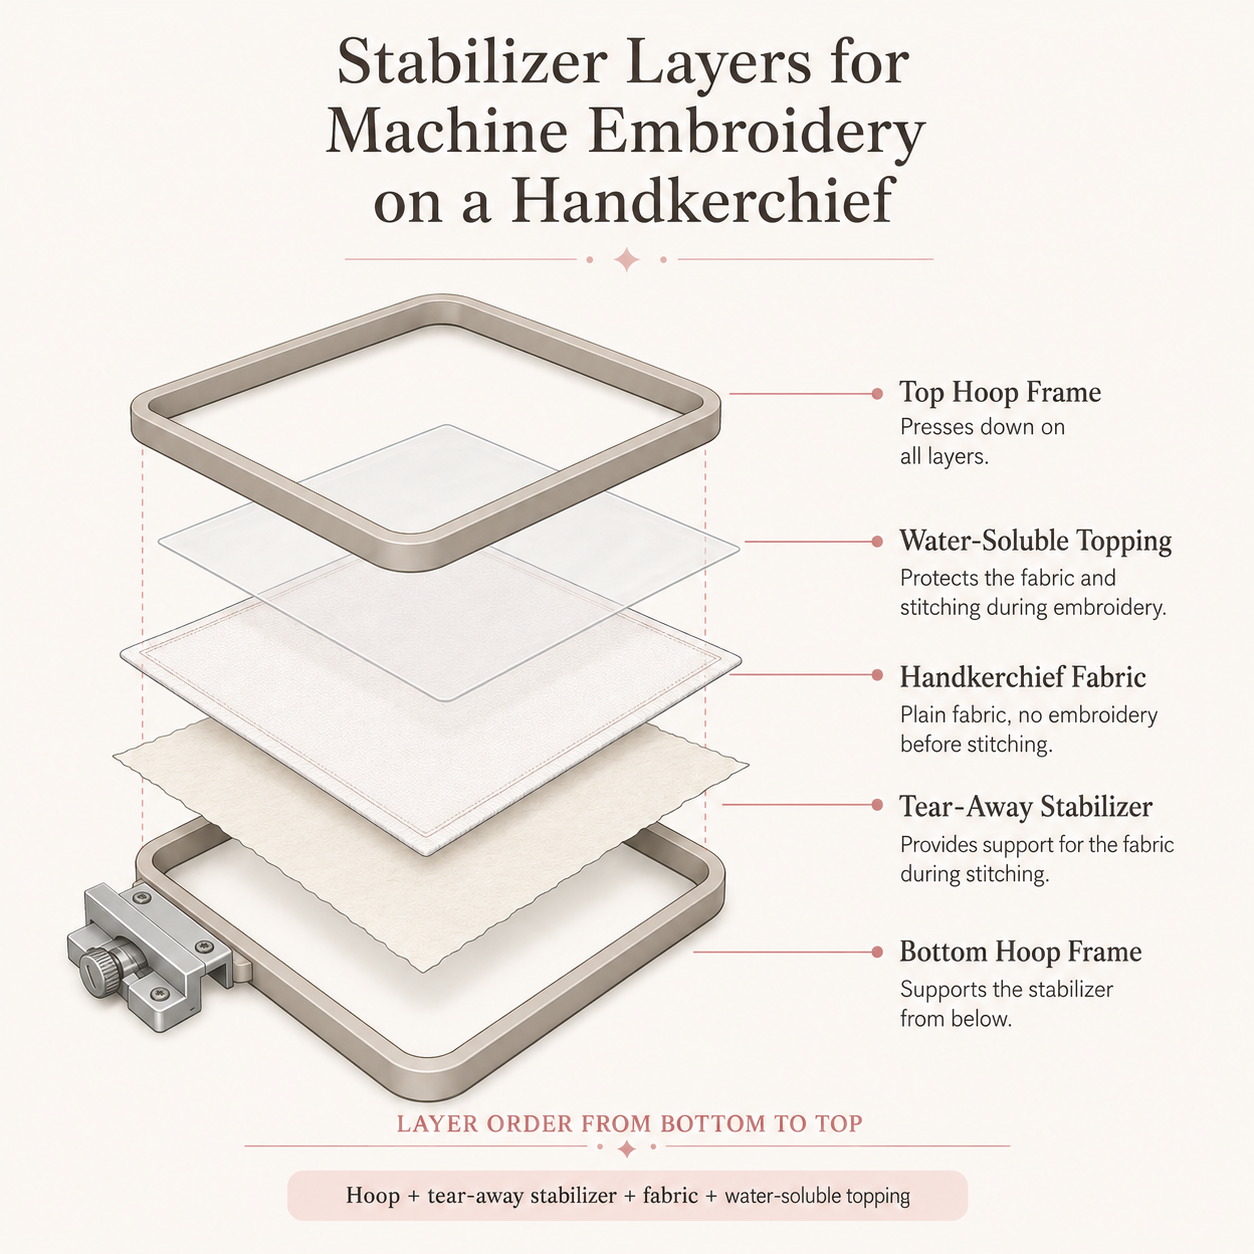
- tear-away stabilizer or self-adhesive tear-away stabilizer
- water-soluble topping if needed
- embroidery thread
- matching bobbin thread
- embroidery hoop
- small scissors
- iron or steamer
If your handkerchief is ready-made and difficult to hoop, a self-adhesive tear-away stabilizer can make placement easier. You can read more about this method in our guide to Madeira Cotton Fix self-adhesive tear-away stabilizer.
Best stabilizer for machine embroidery on handkerchiefs
For handkerchiefs, stabilizer choice is extremely important. The fabric is usually thin, soft and visible from both sides. The goal is to support the stitches during embroidery without leaving a stiff or bulky result.
Option 1: tear-away stabilizer
A lightweight tear-away stabilizer works well for many handkerchief projects, especially when the design is small and not too dense. It supports the fabric during stitching and can be carefully removed after embroidery.
This option is good for:
- small corner designs
- tiny monogram frames
- light floral motifs
- simple initials
- tone-on-tone embroidery
Option 2: self-adhesive tear-away stabilizer
Self-adhesive tear-away stabilizer is helpful when you do not want to hoop the delicate fabric directly. You hoop only the stabilizer, remove the paper layer, and place the handkerchief on the sticky surface using the marked center and axis lines.
This method is especially useful for:
- ready-made handkerchiefs
- small corners
- thin fabric that may get hoop marks
- accurate monogram placement
- projects where the embroidery area is close to the edge
Option 3: water-soluble topping
Water-soluble topping is not always necessary for smooth cotton or linen, but it can help if the fabric has texture or if the stitches need a cleaner surface. It sits on top of the fabric and prevents stitches from sinking into the weave.
After embroidery, remove the excess topping and rinse or dab away the rest according to the stabilizer instructions.
For more technical information about fabric, stabilizer and stitch density balance, see our guide: Perfecting Stitch Density, Fabric and Stabilizer Balance.
How to place embroidery on a handkerchief
Placement is what makes handkerchief embroidery look professional. Even a beautiful design can look wrong if it is too close to the edge, tilted or visually unbalanced.
For corner embroidery, place the design so it follows the direction of the corner and leaves enough breathing room around the edges. Do not place the design so close to the hem that the stitches pull the edge inward.
General placement tips
- print the embroidery template in full size
- place the template on the handkerchief before marking
- check the distance from both edges
- mark the center point
- mark the horizontal and vertical axis lines
- make sure the design is not tilted
- test the placement visually before hooping
If you are adding a monogram or initials, leave enough space inside the frame. The letter should look balanced, not squeezed. You can combine mini frames with letters from our Fonts, Alphabets and Monograms category.
How to hoop a handkerchief for machine embroidery
There are two common ways to hoop a handkerchief. The best method depends on the fabric, the design and the exact placement.
Method A: hoop the fabric and stabilizer together
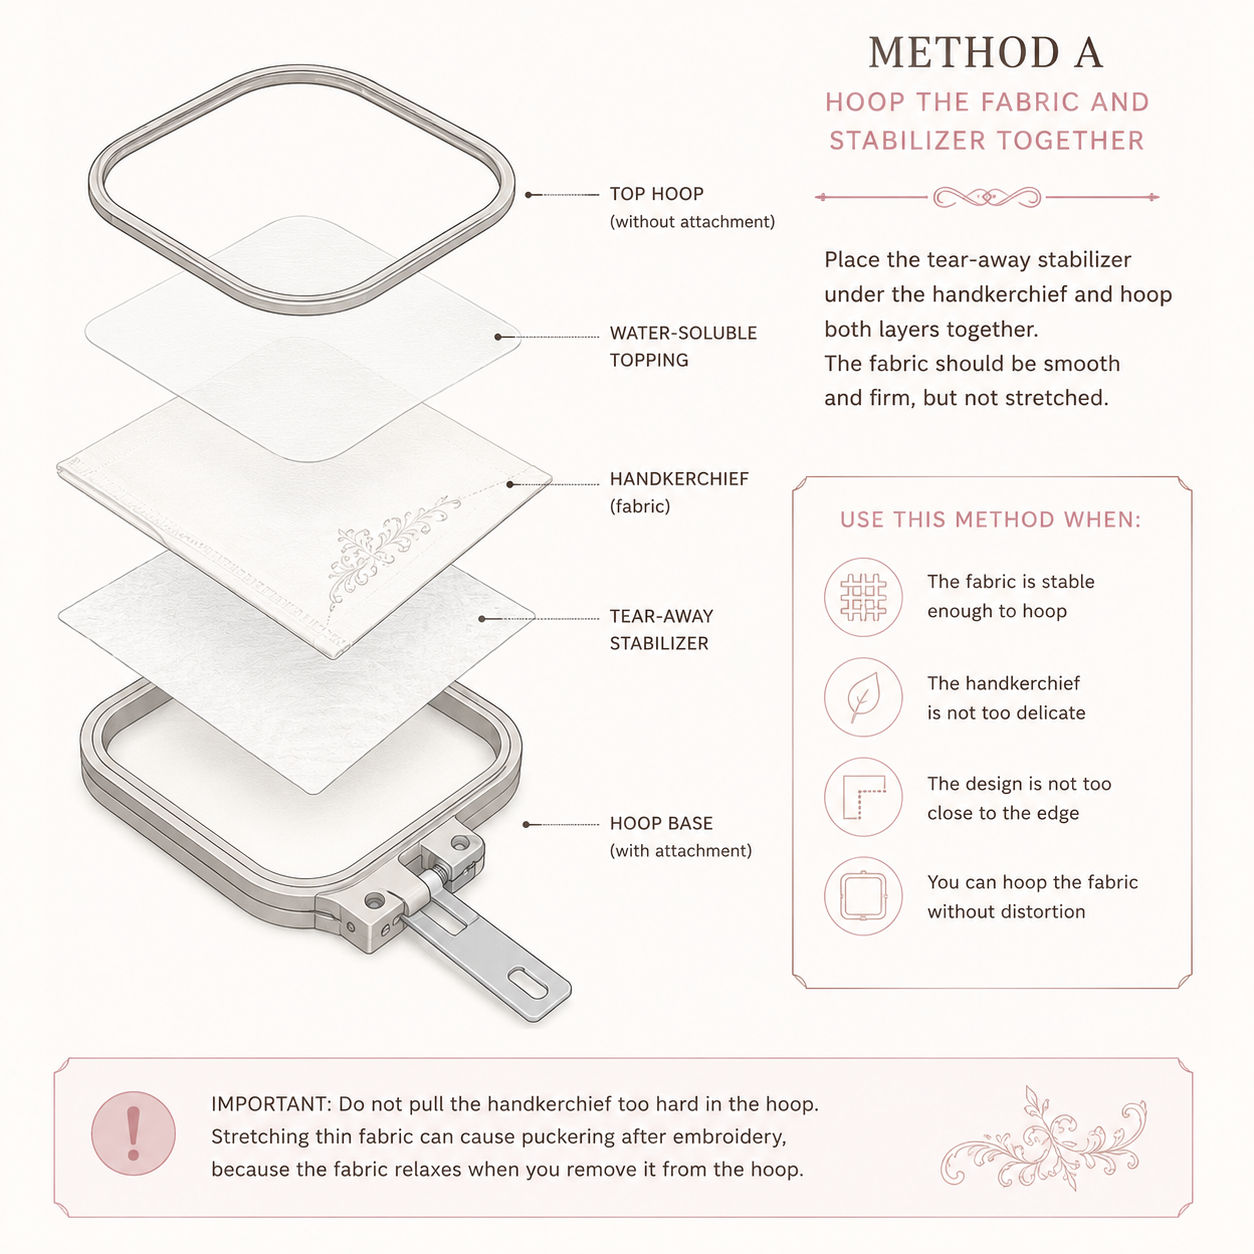
This is the traditional method. Place the tear-away stabilizer under the handkerchief and hoop both layers together. The fabric should be smooth and firm, but not stretched.
Use this method when:
- the fabric is stable enough to hoop
- the handkerchief is not too delicate
- the design is not too close to the edge
- you can hoop the fabric without distortion
Important: do not pull the handkerchief too hard in the hoop. Stretching thin fabric can cause puckering after embroidery, because the fabric relaxes when you remove it from the hoop.
Method B: hoop only the stabilizer and float the handkerchief
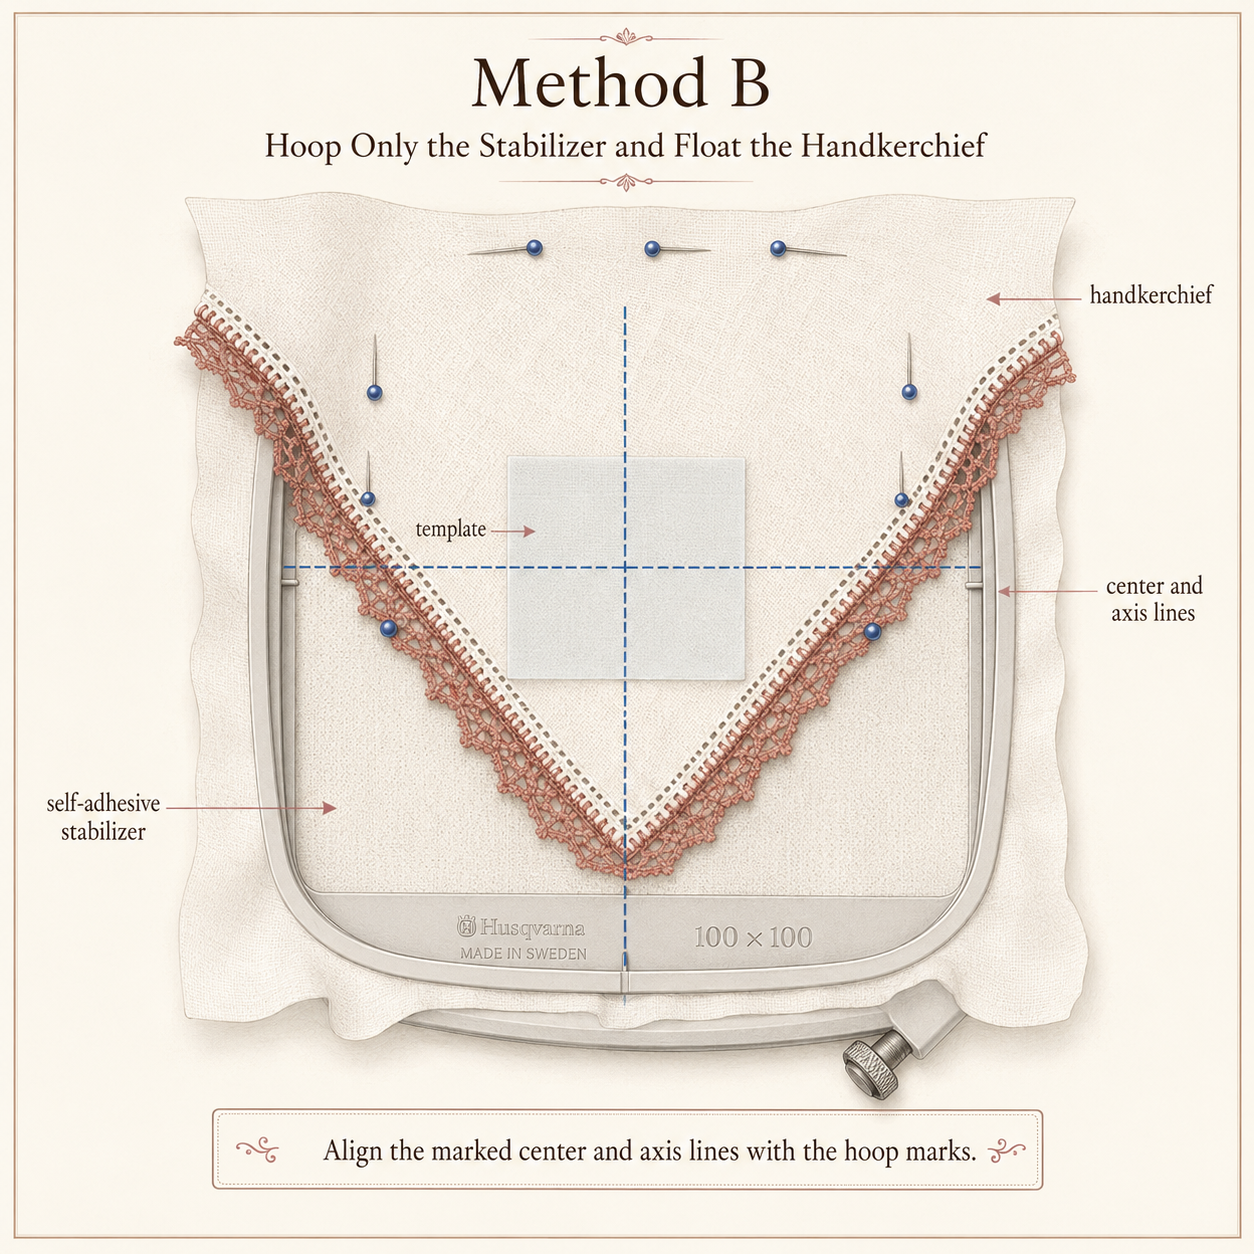
This method is often safer for delicate handkerchiefs. Hoop self-adhesive tear-away stabilizer, open the sticky area, and place the handkerchief on top. Align the marked center and axis lines with the hoop marks.
Use this method when:
- the fabric is very thin
- the handkerchief already has a finished hem
- you want to avoid hoop marks
- the design is close to the corner
- you need accurate placement for a monogram
Step-by-step handkerchief embroidery tutorial
Step 1: Choose a light embroidery design
Choose a design that matches the fabric. For thin handkerchiefs, avoid heavy filled areas and very dense embroidery. Small corner designs, tiny frames, light floral elements and monograms are usually the safest choice.
Step 2: Print the template
Print the design template in full size. The template should show the design outline, center point and axis lines. Place it on the handkerchief and check the position before marking anything.
Step 3: Mark the center and axis lines
Use an air-erase or water-soluble marking pen. Mark the embroidery center and the X/Y axis lines. These marks will help you align the handkerchief in the hoop.
Do not skip this step. On a small handkerchief, even a small tilt can be visible.
Step 4: Prepare the stabilizer
Place tear-away stabilizer under the handkerchief, or hoop self-adhesive tear-away stabilizer if you prefer to float the fabric. If the fabric surface is textured, add a layer of water-soluble topping on top.
Step 5: Hoop or float the handkerchief
Hoop the layers carefully. The fabric should be smooth, but not stretched. If you are using self-adhesive stabilizer, place the handkerchief on the sticky surface and press it gently with your fingers.
Make sure the axis lines on the fabric match the hoop marks. This is what keeps the design straight.
Step 6: Check the needle position
Before stitching, move the needle to the marked embroidery center. Use the machine’s trace function if available to make sure the design fits the intended area and does not touch the hem.
Step 7: Stitch the design
Use a moderate machine speed. Fine fabric behaves better when the machine is not running too fast. Watch the first stitches carefully to make sure the fabric does not shift.
Step 8: Use matching bobbin thread if the back is visible
A handkerchief is often seen from both sides. If you embroider white-on-white, use white bobbin thread as well. If you use colored thread, choose bobbin thread that looks neat on the reverse side.
Step 9: Remove the stabilizer
After embroidery, remove the handkerchief from the hoop. Carefully tear away the stabilizer from the back. Do not pull aggressively near the stitches.
If you used water-soluble topping, remove the excess and rinse or dab the remaining stabilizer according to the product instructions.
Step 10: Press the handkerchief
Let the handkerchief dry completely. Press it from the wrong side on a soft towel. Do not flatten the embroidery too hard. Steam can help relax the fabric and give the handkerchief a clean finished look.
White-on-white machine embroidery on handkerchiefs
White-on-white embroidery is one of the most classic techniques for handkerchiefs. It looks elegant, subtle and expensive without being visually heavy. It is especially suitable for weddings, baptism gifts, bridal accessories and heirloom-style linen.
For white-on-white embroidery, use white or ivory thread that matches the handkerchief fabric. If the fabric is pure white, use white thread. If the fabric is warm ivory or natural linen, a softer ivory thread may look more harmonious.
Tips for white-on-white embroidery
- use matching top and bobbin thread
- choose a design with clear lines
- avoid overly dense fills
- use good lighting when placing the design
- press gently after washing out the topping
- test the design on a fabric scrap first
White-on-white embroidery is quiet luxury in machine embroidery. It does not shout, but it makes the textile look personal and refined.
Monogram handkerchief embroidery
A monogrammed handkerchief can be a deeply personal gift. It works beautifully for weddings, anniversaries, baptism keepsakes, mother-of-the-bride gifts, memorial keepsakes and elegant everyday linen.
You can embroider a single initial, a two-letter monogram or a small decorative frame with a letter inside. Tiny frames are especially useful when a full-size monogram would look too large for the handkerchief.
For small personalized projects, see the Mini Monogram Frames Machine Embroidery Design Bundle. These frames are designed for initials, small monograms and delicate linen projects such as handkerchiefs, sachets, napkins, gift bags and wedding favors.
Common mistakes when embroidering handkerchiefs
Using a design that is too dense
A dense design can pull thin fabric, create puckering or make the handkerchief feel stiff. For handkerchiefs, lighter designs usually look more expensive and stitch better.
Placing the design too close to the edge
If the design is too close to the hem, the stitches may distort the edge. Leave enough space between the embroidery and the finished edge.
Stretching the fabric in the hoop
Thin fabric should be smooth, not stretched. If you stretch it, the fabric may relax after stitching and create wrinkles around the embroidery.
Using the wrong bobbin thread
The reverse side of a handkerchief can be visible. Matching bobbin thread makes the embroidery look cleaner and more professional.
Skipping the test stitch
Always test the design on similar fabric before embroidering the final handkerchief. This helps you check stabilizer choice, thread color, density and placement.
Design ideas for embroidered handkerchiefs
Here are several beautiful ways to use machine embroidery on handkerchiefs:
- white-on-white corner embroidery for bridal handkerchiefs
- tiny monogram frame with one initial
- small floral corner for linen handkerchiefs
- tone-on-tone embroidery on pastel cotton
- mini border along one edge
- small date or initials for a wedding keepsake
- matching handkerchiefs for bridesmaids or family gifts
If you want a small frame for initials, you may also like the Mini Baroque Frame Monogram Machine Embroidery Design, which is suitable for small personalized textile projects.
How to choose thread color for handkerchief embroidery
Thread color changes the mood of the finished handkerchief. White, ivory and tone-on-tone colors create a classic heirloom look. Soft pastels feel romantic and delicate. Metallic thread can look festive, but it should be used carefully on very thin fabric.
Elegant thread choices
- white thread on white linen
- ivory thread on natural linen
- pale pink thread on white cotton
- light blue thread for baptism gifts
- soft grey thread for a modern monogram
- gold accent thread for wedding keepsakes
For the most delicate result, choose thread that is close to the fabric color. This gives the handkerchief texture and elegance without making the embroidery too bold.
Care tips for embroidered handkerchiefs
Handkerchiefs are often washed, pressed and handled frequently, so finishing matters.
- wash gently after embroidery if water-soluble topping was used
- do not twist the embroidered area
- dry flat when possible
- press from the wrong side
- use a soft towel under the embroidery while pressing
- avoid heavy pressure directly on raised stitches
For more general embroidery care information, visit our Machine Embroidery Library, where we collect tutorials, tips and guides for machine embroidery projects.
FAQ: machine embroidery on handkerchiefs
Can I machine embroider a ready-made handkerchief?
Yes. A ready-made handkerchief can be embroidered, especially if the design is small and placed carefully. For difficult placement or delicate fabric, hoop self-adhesive tear-away stabilizer and place the handkerchief on top instead of hooping the fabric directly.
What stabilizer should I use for handkerchief embroidery?
For many handkerchief projects, lightweight tear-away stabilizer or self-adhesive tear-away stabilizer works well. If the fabric has texture, add water-soluble topping on top of the fabric.
Can I embroider white-on-white on a handkerchief?
Yes. White-on-white embroidery is one of the most elegant options for handkerchiefs. Use matching top and bobbin thread, choose a light design and avoid heavy density.
Should I use the same bobbin thread as the top thread?
If the reverse side of the handkerchief will be visible, matching bobbin thread is recommended. It makes the back side look cleaner and more finished.
What designs are best for handkerchiefs?
Small corner designs, tiny monogram frames, light floral motifs, initials and tone-on-tone ornaments are the best choices. Avoid large dense designs on thin fabric.
Can I add a monogram to a handkerchief?
Yes. You can add a single initial, small monogram or decorative monogram frame. Choose a frame size that fits the handkerchief and leaves enough space around the embroidery.
Do I need to test the design first?
Yes. A test stitch is strongly recommended because thin fabric reacts differently to stitch density, thread, stabilizer and hooping pressure.
Recommended designs for handkerchief embroidery
For small handkerchief embroidery, choose delicate designs with clean outlines and moderate stitch density. Monogram frames, mini frames and corner designs work especially well because they personalize the fabric without covering too much of it.
Browse these collections and designs:
- Mini Monogram Frames Machine Embroidery Design Bundle
- Monogram Frames machine embroidery designs
- Fonts, Alphabets and Monograms
- Machine Embroidery Library
About the designer
This guide was prepared by Royal Present Embroidery, a machine embroidery design studio led by Ludmila Konovalova. Each design is created with attention to stitch quality, fabric behavior, hoop size and real embroidery results.
Machine embroidery is not only about decoration. It is about understanding how thread, fabric, stabilizer and design structure work together. This is especially important for delicate projects such as handkerchiefs, where every small detail is visible.

Author: Ludmila Konovalova
My name is Ludmila Konovalova, and I lead Royal Present Embroidery. Embroidery for me is more than a profession; it is a legacy of my Ukrainian and Bulgarian heritage, where every woman in my family was a virtuoso in cross-stitch and smooth stitching. This art, passed down through generations, is part of my soul and a symbol of national pride.
Date: 18.05.2026

 Get Sign-In Link
 Login with Google
 Login with Facebook
 Login with Amazon
 Login with Paypal