What is it with daisies that make everyone feel just so incredibly brightened up? Is it the fact that they are practically made of aromatic rays of sunshine? Is it their fresh colours and luminous grace? For a better answer one can ask Meg Ryan, what with her fascination with daisies in “You’ve Got Mail” and all. Or better yet Dolce and Gabbana, as it seems these Italian fashion designers got absolutely enchanted by the dainty white flowers.
They suggest we drape ourselves in daisies any hour of the day, be it for formal occasions or casual soiree. “Hear, hear” we say, taking the daisy fad to a whole new level with Set of Machine Embroidery Designs Daisies. Broadening the famous Italian flair, this set of daisy designs besides garments can now dress up also interior textiles, bags and other fabric accessories of yours.
Everything is just so fresher, brighter, better with daisies. Feeling gloomy and under the cloud? Take a breather in the comfy flowerbed of throw pillows, adorned with set of machine embroidery designs daisies. Such bright and cheerful company will put you on a sunnier side in no time! Take the white floral pick-me-ups with you everywhere you go by embroidering them on oh-so-very handy and stylish canvas totes. For embroidering on canvas, make sure to pick the right needle, as the fabric has its special preferences. Generally for embroidering on canvas 80/12 sharp needles will do.
Set of Machine Embroidery Designs Daisies

Formats: pes, .pec, .hus, .vip, .dst, .exp, .sew, .dat, .vp3, .jef, xxx
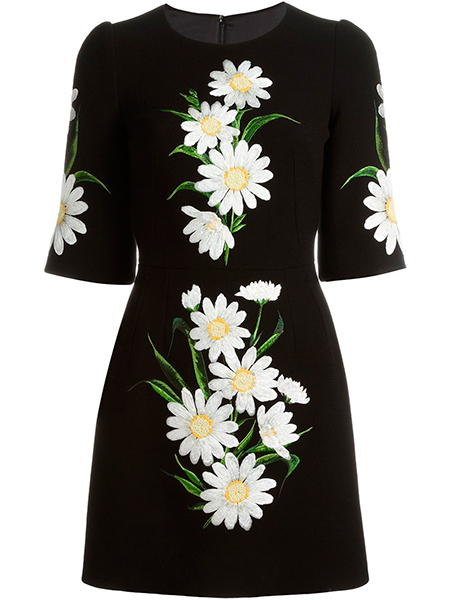
What’s the worth of flowers if they don’t make us, women, look even more elegant and pretty? And daisies, especially such trendsetting as those, starring in Set of Machine Embroidery Designs Daisies, can really make it happen. Make them bloom on cocktail dresses, denim skirts or other things that your inner designer might tell you. If you’re more into casual, sporty style, then know that this set of daisies if great for embroidering on sweatshirts.
Embroidered hoodies, hooded pullovers and sweatshirts are all the rage in the last days of the colder season. So why not take advantage of the blooming trend and make a customized one especially for your dear self? Maybe you’re intimidated by difficulties of embroidering on ready-made clothes? Or, haven’t yet tried machine embroidery on stretchy fabric? Don’t be, with few heads-up on how to embroider on sweatshirts you’ll get any homey jersey look chic and spruce!
Embroidering on sweatshirts made easy
When embroidering on sweatshirts the following criteria should be met:
– designs should be positioned correctly (taking into account both its proportion and placement according to other details of the garment, such as necklines, yokes, sleeves etc);
– embroidered design should have no defects (no puckering, loose or missed stitches etc);
– embroidered design should not be cumbersome, bulky or cause any other disproportion or inconvenience in wear (e.g.: too dense and too large designs will not look good on sleeves);
– embroidered design should keep its form withstanding the tall of time and numerous washes (using wrong stabilizer or bad choice of a place will shorten the lifespan of your project)
Now what should you do in order to met all the listed above criteria? Well, there’re certain rules of embroidering on sweatshirts that you need to follow. We’ve rounded them up in a form of a plan with instructions on each of its steps. It is highly advisable to read the list through before any of your projects. Let’s start with the beginning:
1. Placement of the design
– Think of a place to position the pattern. Designs of larger sizes will look better if you position them closer to the center of the garment piece. Designs of smaller sizes will generally look better if you position them closer to the upper side of the sweatshirt. When you work with children’s wear, adjust the small designs’ position a bit closer to the neckline.
Another thing that should be taken into account at the step is the quality of the design itself. Solid patterns (with blocks of solid fill stitching, no filigree etc.) tend to change draping quality of the fabric. If your sweatshirt is made of light, stretchy fabric this point is of double importance. Such designs will look better in use (when the garment will be worn) if you position them in the center of fronts, backs or on yokes. NOT ADVISABLE for embroidering on sleeves, at least in areas where natural folding occurs (e.g. elbows).
–Print out a template and mark the center point and vertical and horizontal axis points. To find the perfect placement, you can print out a template (an image) of the design that you’re going to embroider. Tip: easiest way to print out a template is with the help of Wilcome’s TrueSizer.
Don’t remove the template completely, when marking the points, for better precision in making the marks. These marks will help you later, when you’ll be hooping the area for the embroidery. Tip: For marking use temporary textile markers. They come in various colors (good for embroidering on light textiles). Make sure to read their description, printed on the package for some of them disappear on their own (Hemline offers such markers) while others require washing (like the ones offered by Hobby&Pro and Prym). If your marker requires washing, DO NOT IRON THE FABRIC while it is still on.
– When hooping the area, make sure to align the points, you marked on the fabric, with the ones of the inner hoop.
2. Stabilizers, needles and threads, needed for embroidering on sweatshirts
– Choosing the right stabilizer for stretchy cotton blends, which most sweatshirts are made of, depends on many factors: density of the design, quality of the material etc. Usually a cutaway backing, enhanced with temporary spray adhesives, is a good go-to variant of stabilization. (Don’t worry if it might feel a bit too “sturdy” for your convenience, for it softens with washes). We suggest cut-aways, because tear-away stabilizers will not provide the necessary for the type of fabric support. If the texture of the fabric is more delicate (yarns knitted loosely), than a topping of a water-soluble stabilizer can be added.
– The fabric should be hooped together with the backing, whenever it’s possible. Always make sure the excess fabric of the sweatshirt doesn’t come onto the embroidering area. Tip: NEVER USE YOUR HANDS OR FINGERS when keeping the fabric away from the area where the needle stitches. There’re special clips for this purpose (like Wander clips for quilting). If you don’t have them on hand, clam clips for hair or office binder clips will do just fine.
– Right threads are important for sweatshirts embroidering. Royal Present Embroidery always tries designs out with Madeira threads. Depending on type of fabric we calibrate sizes our threads (and needles obviously). Classic rayon # 40 is the good choice for the duo: set of machine embroidery designs daisies on jersey sweatshirts. Reasons: the tread has a softer feel which will work great with solid filling of the daisies (poly might make it too tough). Tip: If your choice of thread is not Madeira (but Gütermann, GUNOLD, etc), we suggest using tables of interchange between threads of various manufacturers. Such tables are widely available on the Internet. Info, provided in such tables will help you not only with the right choice of the quality of the threads, but with their colors too.
Tip: If your machine embroidery design has several color changes (like in set of machine embroidery designs daisies you’ll have 7 of them) it helps if you know which color you use in each. One of the easiest (and cheapest) ways of setting the order and sticking to it is placing your thread cones in an ordinary egg carton. Enumerate each dimple and place the thread cones according to the list, given in the digital description of your design. This simple arrangement will help you make machine embroidery process easier.
– Choosing embroidery needles for embroidering on sweatshirts depends on the density of the fabric. Some cotton blends, used in making sweatshirts, are denser and need ballpoint needles (SES) as thick as size 90/14. Lighter ones can be embroidered with SES needles, sizes of which may range from 70/10 – 80/12.
– After you’ve completed embroidering on sweatshirts, unhoop the fabric as usual. Usually cotton blends used for sweatshirts withstand the hoop pressure very well, so don’t worry about the marks. The only thing to consider here is the amount of the excess backing that should be removed. Always make sure to leave 1/2″ around the outline of the pattern.
You may also like


Author: Ludmila Konovalova
My name is Ludmila Konovalova, and I lead Royal Present Embroidery. Embroidery for me is more than a profession; it is a legacy of my Ukrainian and Bulgarian heritage, where every woman in my family was a virtuoso in cross-stitch and smooth stitching. This art, passed down through generations, is part of my soul and a symbol of national pride.
Date: 12.04.2016

 Get Sign-In Link
 Login with Google
 Login with Facebook
 Login with Amazon
 Login with Paypal