So, summer is officially here and all its colorful motives and aestival fads are ready to be re-introduced into the streets, fashion blogs and other popular vogue scenes. Vibrant florals, dynamic ethnic and whimsical boho – these trends are true kings of all things summer! That’s why everybody tries to fit all of them into their wardrobe. We know we are, and thus you must be too, right? And you know what? With Estonian Machine Embroidery Design Bouquet of Poppies now you finally can! This beautiful wild flower design has the charm of homespun traditions, upped by finesse of modern decorative modes. It’s fresh, it’s swanky and it really can bring summer vibes into your outfits, wardrobe and overall style.
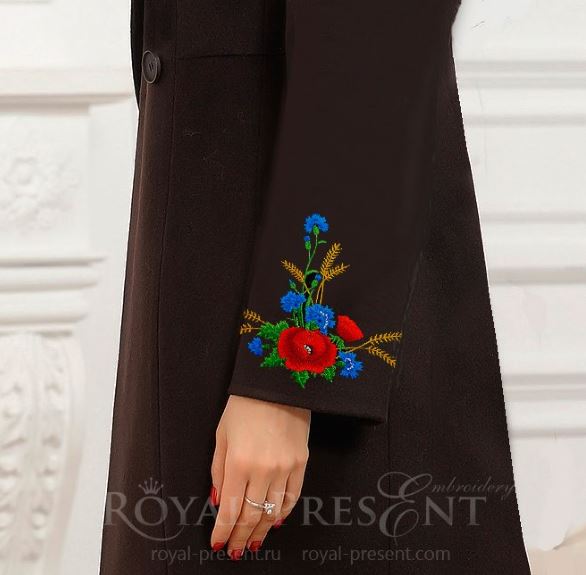
Estonian Machine Embroidery Design Bouquet of poppies

Formats: .dst, .jef, .pec, .vip, .hus, .pes, .exp, .sew, .dat, vp3, xxx
Inspired by traditional Muhu embroidery art, Estonian Machine Embroidery Design Bouquet of Poppies mixes all the hot summer motives. Work it on light summer dresses for bright and refreshingly whimsical take on the usual bohemian look. It’s perfect for all those filled-with-fun-and-sweet-romance summer parties! Your summer fun is yet to come because of all the deadlines in the office? Take this Bouquet of Poppies with you to work to cheer things a bit up. A plain white shirt, embroidered with red Muhu poppies, will keep your spirit up with its lively but stylish poise. Not fun of plain white? Muhu flowers design can bloom marvelously on stripes, pink, blue or any other office-appropriate color or pattern! The fact that you can wear such shirt to other occasions doesn’t hurt either! In fact, let us tell about the shirt a bit more…
Smart, trendy and oh-so-very versatile, embroidered with flowers shirt will be your go-to item all through the sunny season. Mix it with shorts for a happy-hour cocktail meeting with friends. Else, you can pair the shirt with a skirt to look pretty on a romantic Saturday outing. For Sunday morning walk on the beach, movie night or any other occasion on your calendar – you’ll need the hottest trend of this summer, a shirt with embroidered flowers. Luckily for you, Royal Present Embroidery offers not only Estonian Machine Embroidery Design Bouquet of Poppies, the means to make the trend yours. With it we also provide a step-by-step instruction of HOW to make the embroidery work. If you’re interested in becoming a trendsetter this summer, then read on and you’ll learn all the ropes.
First we’ll speak about the needed supplies. Then we’ll share some handy tip on how to position machine embroidery patterns on placket shirts. After that, when you’ll get familiar with general rules, we’ll get down to the fine points and the instruction.
So, for the embroidered with flowers shirt project you’ll need:
~ A shirt (obviously),
~ Estonian Machine Embroidery Design Bouquet of Poppies and its printed template. The design is available in 3 sizes. So, we suggest you printing out all of the three to see which one will fit your purpose better. If you’re going to embroider a composition of, say two (or more) designs, you’ll need to have same number of printouts. Handling the templates is easier if you trim them a bit.
~ Embroidery needles and threads. As we’ve said, design bouquet of poppies is created in tune with traditions of Muhu embroidery. Muhu patterns are customarily embroidered in cotton (homespun) threads. To better match the artisan flair of the theme, we advice you on using cotton or rayon embroidery threads. The soft, natural sheen of the threads will go fabulously well with traditional pattern like this. Go with good quality threads, like Madeira, Sulky, DMC, Marathon We tested Estonian Machine Embroidery Design Bouquet of Poppies on Madeira Classic # 40, with needles 75/11 sharp. The pattern came out beautifully and with no issue whatsoever.
~ Choice of the stabilizers for machine embroidery on shirts may vary, depending on the quality of the fabric. Usually a cut-away backing with its self adhesive variant is used. However, if your shirt is sheer, the cut-away stabilizer will be seen through the fabric. If you want to avoid it, opt for medium-weight tear-away stabilizer.
~ Temporary spray adhesive (Gunold KK 100, Takter 650, Sulky KK 2000 or any other good quality spray). If you prefer working with sticky stabilizers, and are using them in this project too, then temporary spray adhesive is redundant.
~ Textile marker or a piece of chalk. With shirts of lighter colors, avoid using the chalk as its mark won’t be seen well.
~ Sticky tape.
~ Measuring tools for precise placement of the design. There’re several types of measuring tools that you can use for this project:
1 – Generic ruler (cheap and cheerful classic variant).
2 – Specialty placement ruler (a more cutting-edge variant of measurement makers). It saves lots of time and makes placement of embroidery designs easier. Examples: Creative Notions Embroidery Placement Ruler, Embroiderers Buddy Machine Embroidery Placement Aid
3 – Embroidery placement templates (templates with pre-marked positions for embroidery designs placement). They come in various sizes and even in specialty variants for particular pieces of garments. Examples: Embroidery Tool Kit by Eileen Roche, Embroiderer’s Helper – Template Aid – Placement Tool.
So, take your pick, check your supplies and let’s move on to the next part of our project.
How to position Estonian Machine Embroidery Design Bouquet of Poppies on a placket shirt
Variations for applications of Estonian Machine Embroidery Design Bouquet of Poppies include:
~ front center of the shirt (one or both sides),
~ sleeves,
~ yokes (back and front if there’s such).
Most common composition for two or more floral designs is based on the symmetry. Symmetrical application of the designs can involve mirroring of its images and their rotation. Taking an artistic license and creating an abstract composition on the back or the sides is highly advisable too.
In our instruction we’ll be addressing in detail the symmetrical layout of two (or more) Muhu poppies design at the front center of the shirt. We picked this variant of the décor, because amidst all of the mentioned examples it’s the most difficult to achieve. Placement of each of the elements should be precise because even the slightest mistake or imbalance will stick out like a sore thumb. If everything is done correctly, however, this particular placement makes the biggest impression of all. Your shirt will look gorgeous with two Muhu bouquets of poppies, embroidered at both sides of its placket.
So, shall we begin?
1. Layout of the embroidery.
1.1. Put on your shirt and apply the cutout templates on the area that you want them to be stitched on. The shirt will take the form of your body, “showing” you better positions for the designs.
1.2. Use sticky tape to temporary adhere the templates to the fabric.
1.3. Take off the shirt and place it on your working table.
2. Making precise measurements for the design placement.
2.1. Now we’ll be working with the templates. Your templates have axis lines pre-marked on them. Use your temporary marker and trace the lines onto the fabric. You’ll need to trace their center points too. Remember, these marks are only approximate; they’ll give you a general idea of how the embroidery should look.
2.2. If you’re using mirrored, rotated or otherwise changed designs, make according marks on the fabric. These marks will help you later when you’ll be choosing the right pattern on the display of your machine. When working with “rotated” designs, you’ll need to point their upper side.
2.3. Now that you’ve traced the templates’ marks, measure the distances from the center points to the placket. When measuring, you’ll be going along a horizontal line from each center to the placket. As our goal is to create symmetry, make sure their measurements are the same.
Note: When measuring the distances, make sure the angle of your measuring tool is strictly square (perpendicular) to the placket. If you change its angle, it will affect the measurement.
2.4. Now make the same procedure but with the distance from the center points to the shoulder seam. This time, go vertically.
Note: As shoulder seam is never straight (usually curvy), finding a perpendicular line (the one that we use to measure the distance) might be tricky. To help you out of the conundrum, you can use the “cutting-edge” specialty rulers that we’ve mentioned before. Otherwise, take out that transparent notched grid that comes with your hoop, align its vertical lines with the placket and check your measurements.
3. Hooping and embroidering.
Hoop the item as you would usually do it. If you see that buttons or other obstacles stand in the way of the hoop bands, consider using floating technique.
Floating technique:
The stabilizer is hooped first and the garment is attached to the hooped stabilizer with the help of temporary adhesive. A run of a basting stitching can be applied as an additional form of support.
After the embroidery is over, remove the stabilizer and loose thread ends.
Your trendy embroidered shirt is ready to impress with its vibrant summertime flair. You’ll love sporting folklore Muhu décor all through the summer and even further. Yep, such a beautiful floral pattern can make summer outlast its calendar time. Work it onto a denim jacket to rock cold weather like a true fashionista. You can use the present set of supplies and the instruction for denim jacket decoration project as well.
You may also like
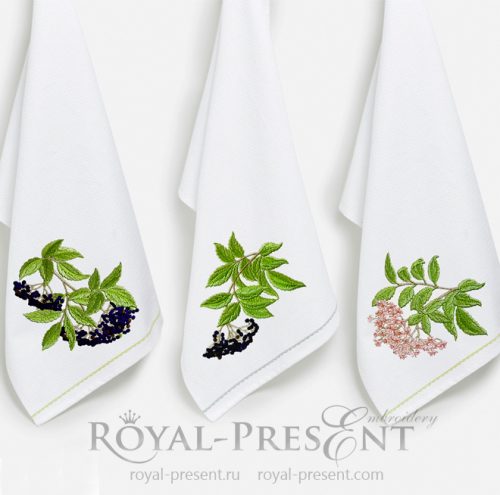
Three Elderberry Branches Machine Embroidery Designs

Author: Ludmila Konovalova
My name is Ludmila Konovalova, and I lead Royal Present Embroidery. Embroidery for me is more than a profession; it is a legacy of my Ukrainian and Bulgarian heritage, where every woman in my family was a virtuoso in cross-stitch and smooth stitching. This art, passed down through generations, is part of my soul and a symbol of national pride.
Date: 26.06.2018

 Get Sign-In Link
 Login with Google
 Login with Facebook
 Login with Amazon
 Login with Paypal