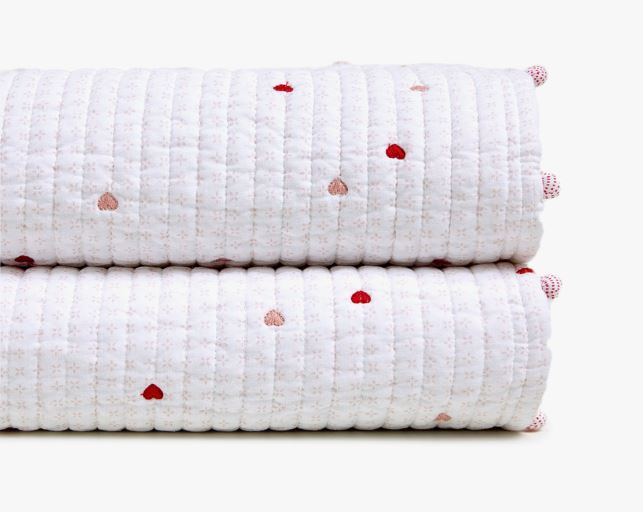
These little hearts from heart machine embroidery designs collection can perfectly decorate any object. That is why such a pattern simply must be in your collection. After all, you can use it anywhere, on towels, T-shirts, pillows, bed linens, napkins, and even curtains and gloves.
Despite the fact that it seems at first shallow and inconspicuous, it is just perfect for decorating clothes and accessories.
Moreover, have you heard that the heart symbol actually has a thousand-year history? According to legends, it appeared in the aftermath of the ivy plant`s appearance. The leaves are very similar to the outward appearance. The ancient Greeks used them very often for the decoration of amphorae. It is believed that from this moment the history of this symbol began. The symbol of the heart has acquired modern meaning later, somewhere in the 15-16 centuries.
Psychologists claim that even the ordinary contemplation of the heart symbol has a positive effect on a person. They consider that we can feel positive vibrations is inside of us. However, scientists speak only about the traditional image of the heart. A modified image of the heart, for example, pierced by an arrow or pins, carries a completely different flow of energy.
If you believe in this idea, there is an even greater need to use this lovely Tiny Heart Free Machine Embroidery Design from heart machine embroidery designs collection for decorating your house and wardrobe.
Tiny Heart Free Embroidery Design

Size: 22.7×22.0 mm (0.89×0.87 “), Stitches: 1046
Size: 30.4×29.5 mm (1.20×1.16 “), Stitches: 1610
Formats: .pes, .pec, .hus, .vip, .dst, .exp, .sew, .dat, .vp3, xxx, jef
Today we want to offer you an unusual and not common embroidery of these hearts on your socks. Such socks can be embroidered both for yourself and for your child. You can make even a few different pairs using just one Tiny Heart Free Machine Embroidery Design. To do this, you need to modify the embroidery, for example, choose the color or location of these hearts
First, we would like to note that some embroidery machines (for example, Elna 9900, Tajima, Happy Rich, Barudan) have in their complete set a special device for embroidery on socks and gloves. It greatly simplifies the process of embroidery on these bases. What to say, for many – this device is just a treasure.
However, most often, even the most advanced embroiderers do not have such device. Therefore, we will now tell you how to embroider Tiny Heart Free Machine Embroidery Design without this accessory on the socks. Moreover, do it perfect and correctly.
It is better and easier to apply embroidery on the elastic of socks. To do this, hoop the needed amount of the cut-away stabilizer. Pin the cloth of the socks above so that the resulting embroidery was on the front side, and not on the wrong side. Embroider the design. When embroidering, make sure that the rest of the fabric of the sock does not fall under the needle. After that, cut off the excess stabilizer. As you can see, nothing is as difficult as it seems at first.
See some others heart machine embroidery designs from our collection.
Well, for those who have a device for embroidery, but you do not know how to fix it and how to use it, we made a special instruction. It is understandable and accessible. Therefore, it will help everyone to understand in a matter of minutes how to use such accessory.
How to install a device for socks and gloves onto the embroidery machine?
1. At the beginning, you need to make sure that you turned off the embroidery machine. This is for not to be injured and to observe all safety and operation rules.
2. Then unscrew the hex of the main hoop holder in the machine and remove the bar from it.
3. Next, attach the bar of the sock hoop holder to the notches in the carriage and screw it with two screws.
4. You will find two types of sock hoops (they are each designated by their number and letter, for example, S1 and S2) and two auxiliary devices for these hoops.
5. On top, attach the cut-away stabilizer to the base of the sock hoop.
6. To place the embroidery correctly, mark the centerlines on the front side of the sock.
7. Put the sock on the accessory so that the lines marked by you coincide with the lines on the device. In this case, it is necessary to straighten the stabilizer. Insert the upper part of the hoop into the sock.
8. Check that you have correctly positioned the stabilizer. It should be exactly centered between the two sides of the sock.
9. To remove the accessory, pull the sock hoops upward.
10. Now, bend the underneath of the sock so that it does not interfere with the embroidery.
11. Check the alignment of the axes lines.
How to apply embroidery on socks with the help of an auxiliary device and special hoop?
12. At the beginning, remember that you cannot set such hoops before turning on the machine. Otherwise, it may affect its correct operation.
13. Select the desired hoop size and the design loaded into the machine. Click Ok and embroider it.
14. At the end, it is necessary to open the embroidery frame, remove the sock and cut off the excess stabilizer.
15. To embroider another sock (because they are different – left and right), flip the sock and embroider on the opposite side.
Embroidery is ready.
You may also like
Free Machine Embroidery Design Lace ornament

Author: Ludmila Konovalova
My name is Ludmila Konovalova, and I lead Royal Present Embroidery. Embroidery for me is more than a profession; it is a legacy of my Ukrainian and Bulgarian heritage, where every woman in my family was a virtuoso in cross-stitch and smooth stitching. This art, passed down through generations, is part of my soul and a symbol of national pride.
Date: 31.03.2018

 Get Sign-In Link
 Login with Google
 Login with Facebook
 Login with Amazon
 Login with Paypal