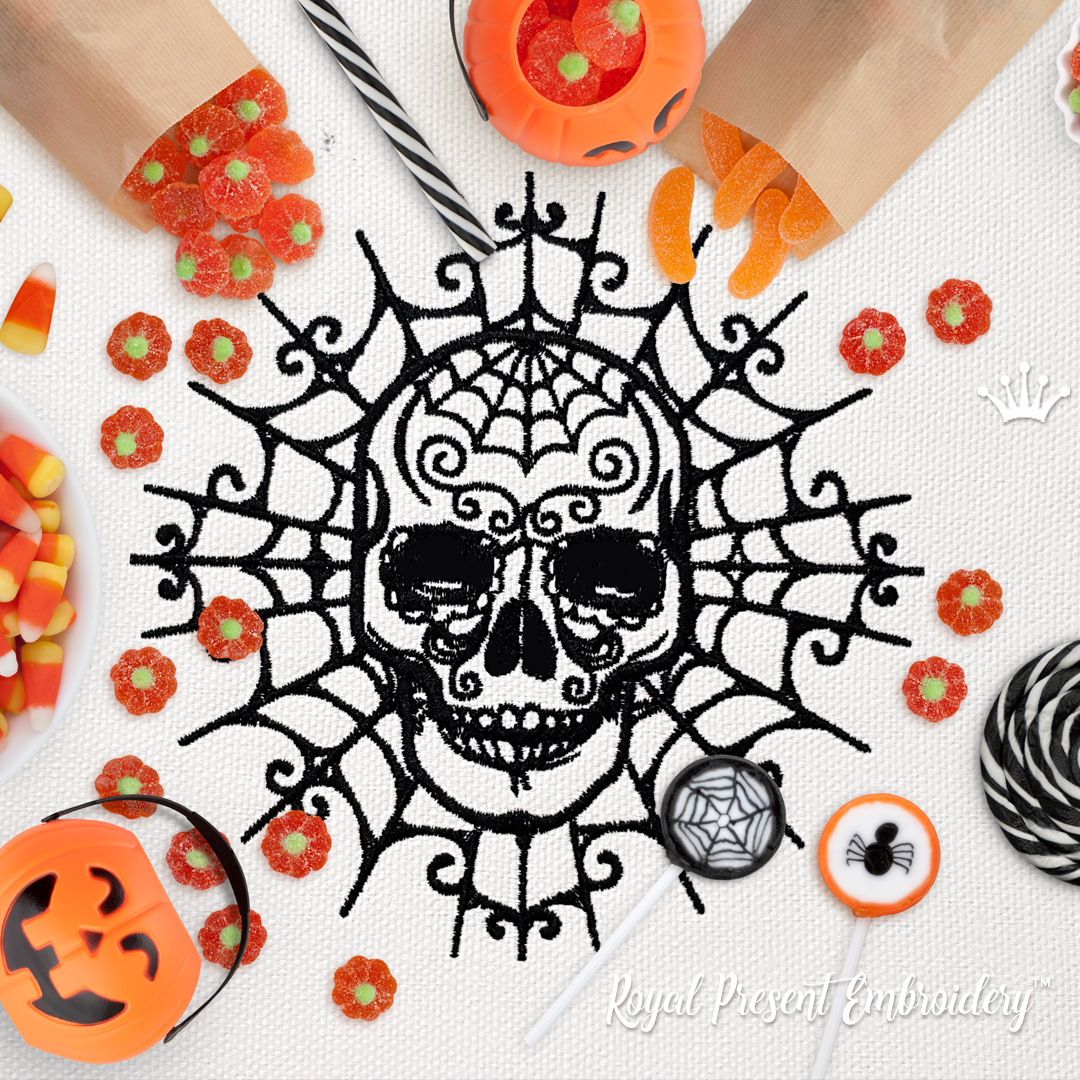
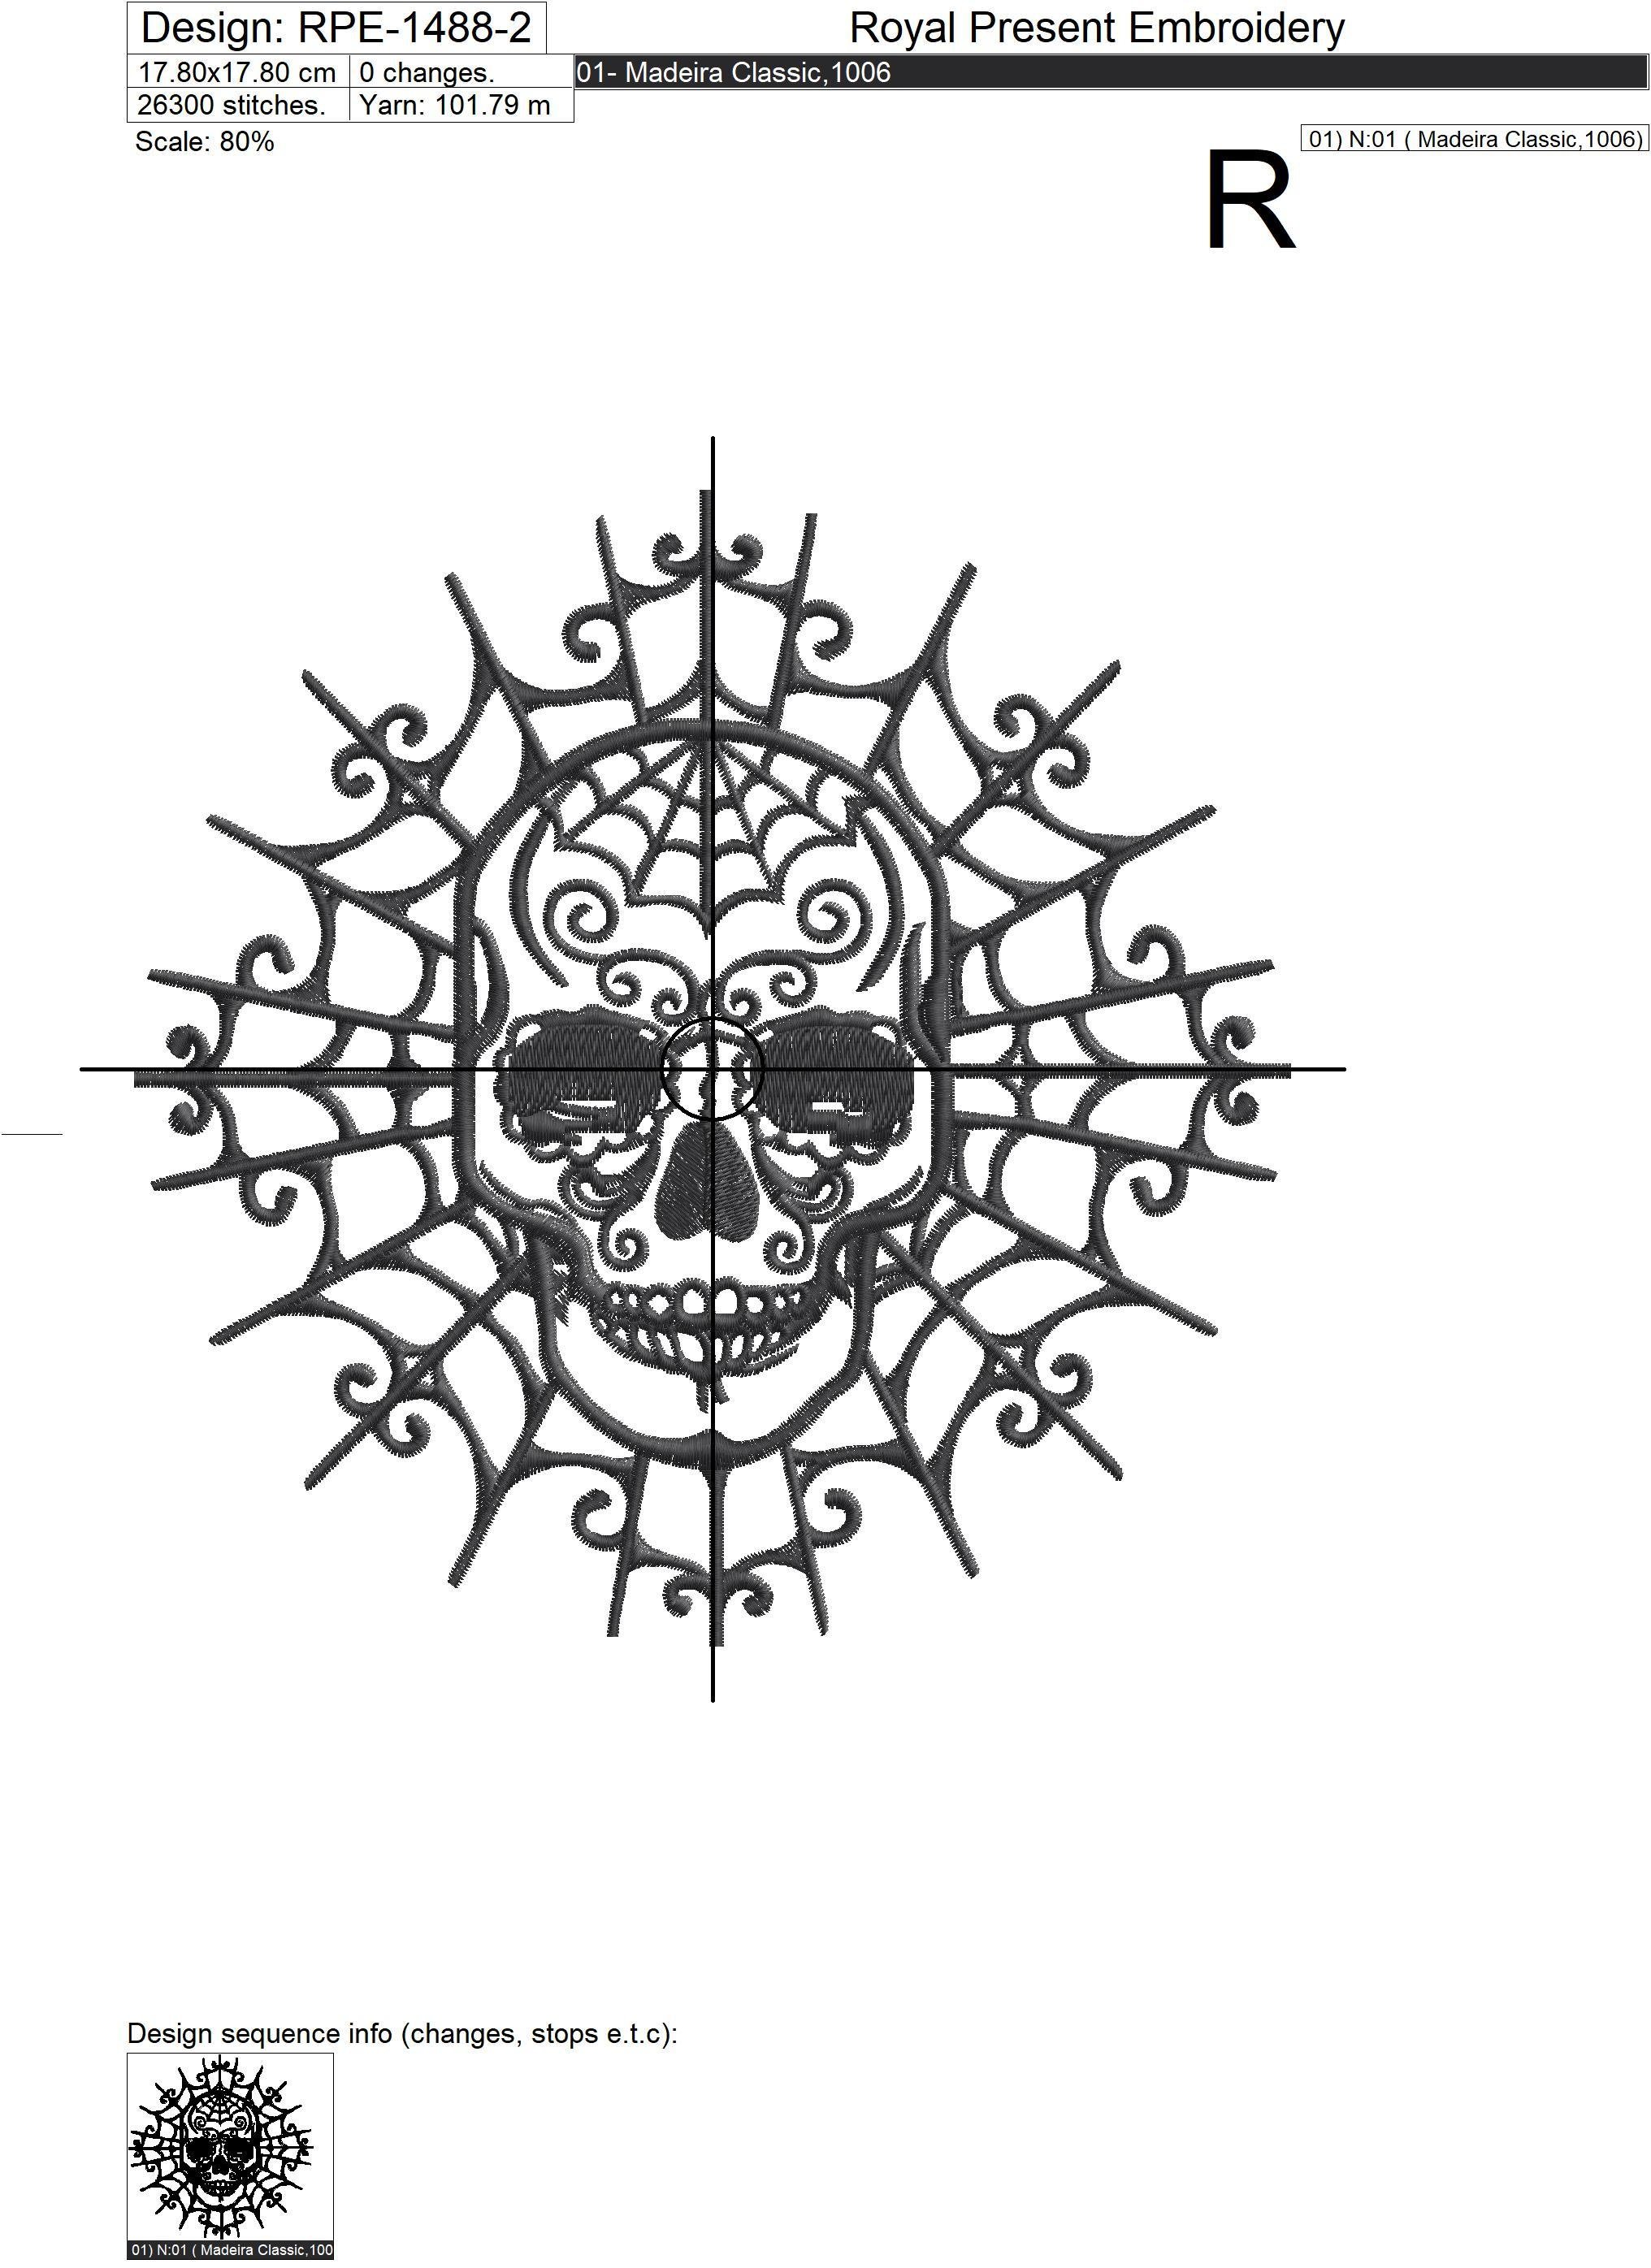
Halloween Skull in Web Machine Embroidery Design is a bold and dramatic embroidery motif for Halloween decor, gothic-style projects, men’s clothing, patches, bags and statement textile accessories. The skull, spider web and ornamental linework make this design perfect for projects that need a strong visual accent.
Although this design is ideal for Halloween, it is not limited only to October projects. Skull embroidery is also popular for biker-style clothing, rock-inspired fashion, denim jackets, hoodies, backpacks, tote bags, patches and dark interior decor.
This design is available in 3 sizes and includes popular machine embroidery formats such as DST, JEF, PES, HUS, VP3, EXP and more. Because the design is large and expressive, it works best as a central embroidery element rather than a tiny decorative detail.
Halloween Skull in Web Machine Embroidery Design - 3 sizes
Where to use skull machine embroidery designs
Skull embroidery designs are strong, expressive and easy to recognize. They work beautifully on Halloween decorations, but they are also a great choice for modern clothing and accessories.
- Halloween placemats — create a dramatic table setting for Halloween dinner or party decor.
- Men’s hoodies and sweatshirts — use the skull as a bold chest or back embroidery.
- Denim jackets — stitch the design directly or make a large embroidered patch.
- Biker-style patches — embroider the skull on twill, felt or patch fabric.
- Backpacks and tote bags — add a gothic, rock or streetwear detail.
- Halloween candy bags — decorate bags for trick-or-treat projects.
- Kitchen towels and aprons — create spooky but stylish seasonal textiles.
- Dark pillows and wall decor — use skull embroidery for gothic home decoration.
If you want to browse more seasonal designs, visit our Halloween Machine Embroidery Designs category.
Halloween skull embroidery for placemats
One of the best ways to use this design is to embroider it on a Halloween placemat. A skull in a spider web looks very effective under a plate, beside candles, black napkins, orange pumpkins and Halloween candy.
For this project, choose a strong fabric: burlap, canvas, dense linen, cotton duck or upholstery-weight fabric. These fabrics can support a large embroidery design better than very thin fabric.
Burlap is especially good for rustic Halloween table decor, but it needs correct stabilization because the fabric structure is loose. Use a lower stabilizer and add a water-soluble topping on top so the stitches do not sink between the fibers.
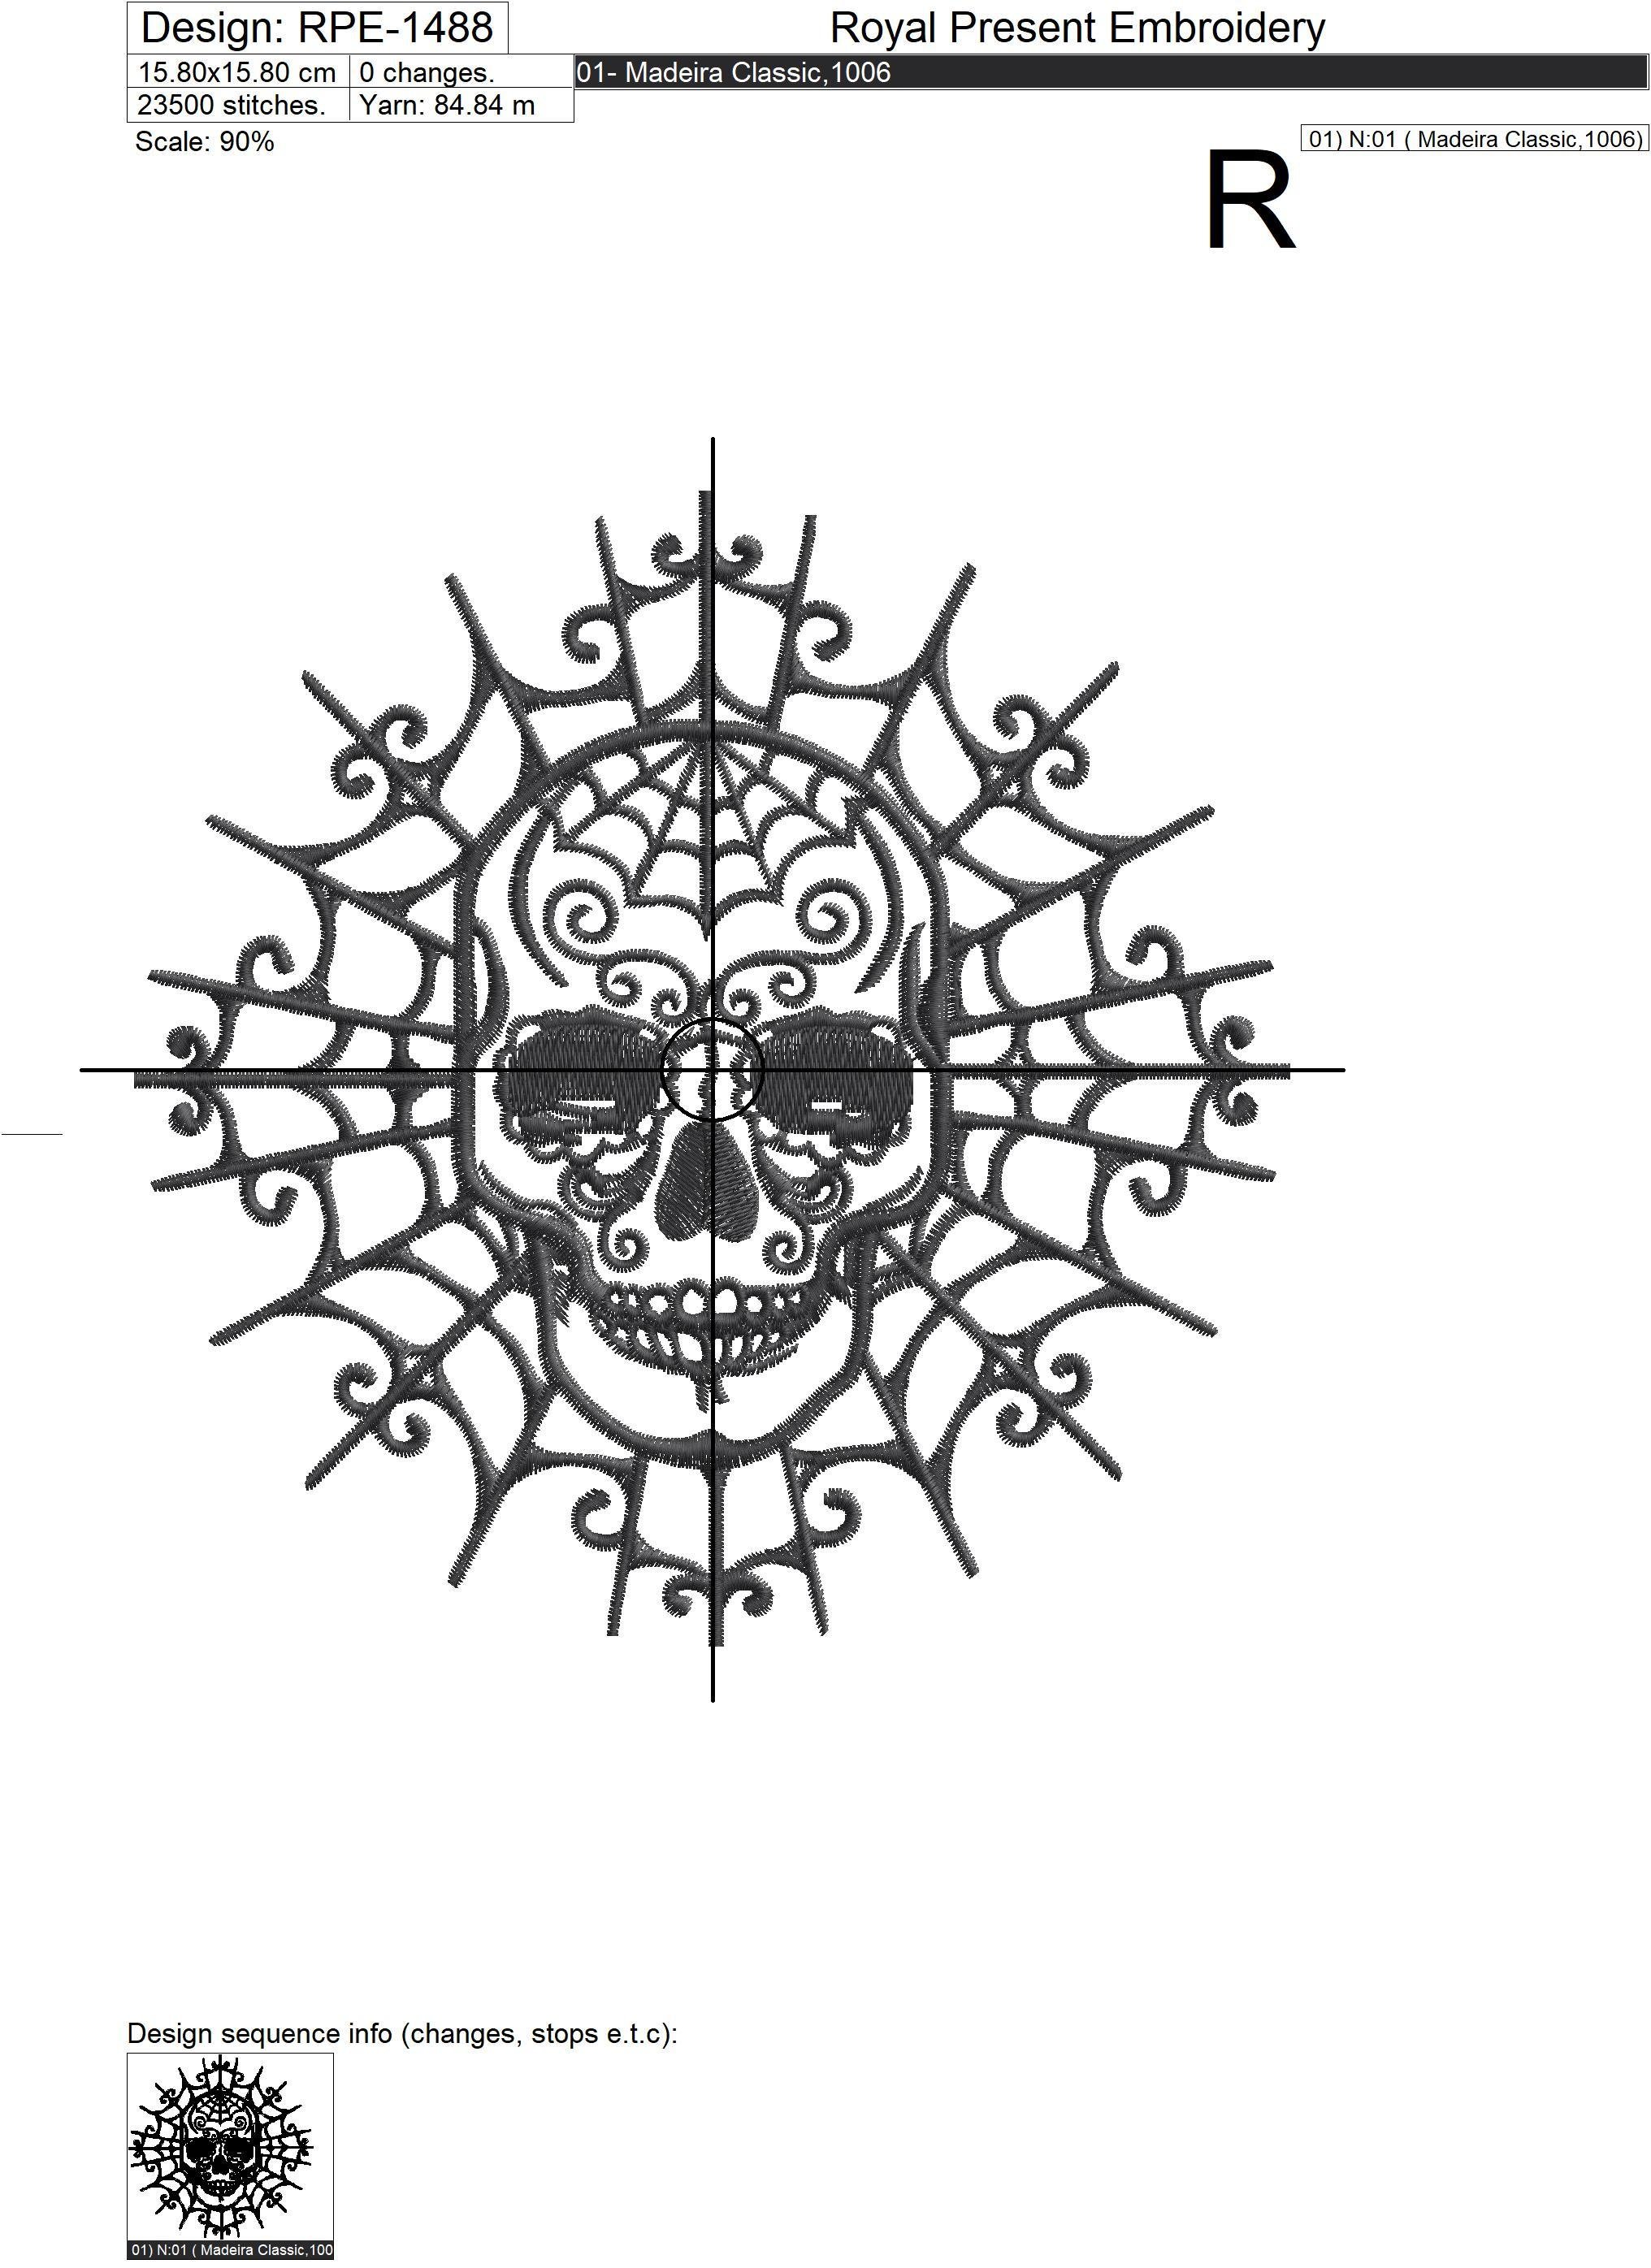
Halloween Skull in Web Machine Embroidery Design - color chart, small size
Machine embroidery on burlap fabric
Burlap is dense, textured and loose at the same time. It can look fantastic for Halloween projects, but it needs preparation.
- Design choice: medium-density and dense designs are usually better for burlap than very thin outline designs.
- Lower stabilizer: use tear-away or cut-away stabilizer, depending on the project. Test first if you choose tear-away.
- Top stabilizer: use water-soluble topping to prevent stitches from falling into the fabric structure.
- Needle: use a sharp embroidery needle, for example size 75/11.
- Thread: black, white, metallic or glow-in-the-dark thread can all work beautifully for Halloween.
- Cleaning after embroidery: remove excess stabilizer carefully. Do not completely soak burlap; use a damp sponge for small topping leftovers.
This technique is useful not only for placemats, but also for Halloween banners, rustic table runners, wall hangings and spooky party decor.
Use glow-in-the-dark thread for a spooky effect
A skull design is perfect for experimenting with glow-in-the-dark embroidery thread. You can stitch the entire design with fluorescent thread or use it only for the spider web, skull outline or decorative details.
During the day, the embroidery looks clean and graphic. In the dark, the glowing areas create a Halloween surprise effect. This is especially good for children’s candy bags, party decor, Halloween pillows, trick-or-treat bags and spooky table settings.
When using specialty thread, slow down the embroidery speed and test the stitchout first. Some glow-in-the-dark and metallic threads need a little more patience than regular rayon or polyester embroidery thread.
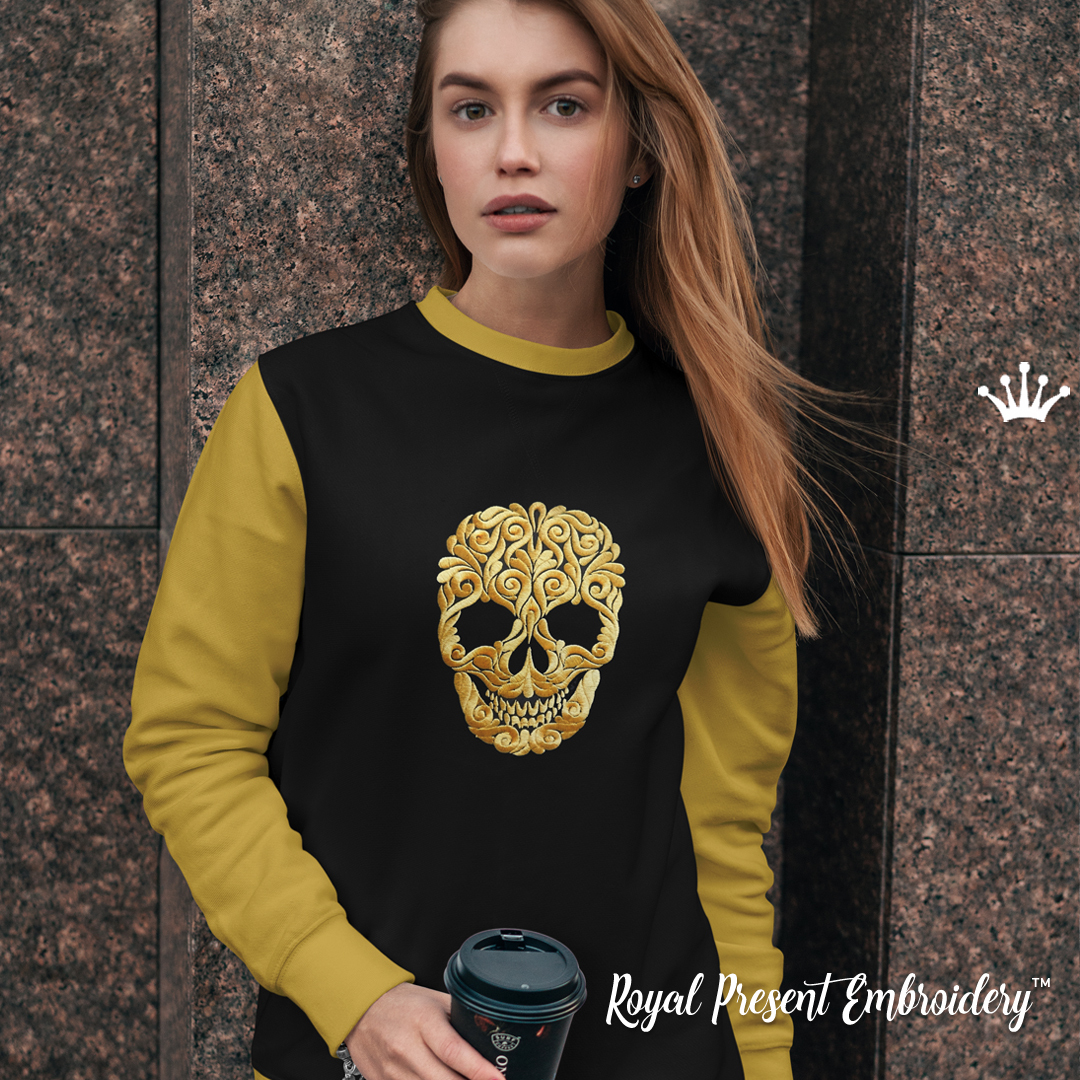
Skull embroidery for men’s clothing
Skull embroidery is not only for Halloween. It is also one of the strongest motifs for men’s clothing, rock style, biker fashion and bold streetwear.
A skull design can look very stylish on a black hoodie, denim jacket, bomber jacket, sweatshirt or backpack. For men’s clothing, choose dark fabric and strong contrast thread colors: black and white, gold on black, silver on navy, red and black, or monochrome gray.
- Chest placement: good for sweatshirts, hoodies and T-shirts.
- Back placement: best for denim jackets and large hoodies.
- Sleeve placement: good for smaller skull patches.
- Patch placement: useful for jackets, backpacks and biker-style garments.
Machine Embroidery Design Halloween Skull - 3 sizes
This style works especially well for customers who want a design that feels less cute and more dramatic. It can be used for Halloween, but also for everyday clothing with a gothic, tattoo or rock-inspired mood.
Direct embroidery or embroidered patch?
You can use skull embroidery in two ways: stitch it directly on fabric or create a separate embroidered patch.
Direct embroidery is best for stable fabric that can be hooped correctly: cotton, canvas, denim, linen, sweatshirts and some jackets.
Embroidered patches are better when the item is difficult to hoop: finished jackets, thick backpacks, leather-look garments, caps, biker vests and heavy outerwear.
- Use twill, felt or patch fabric as the base.
- Stitch the design first, then cut the patch neatly.
- Attach the patch by sewing, heat press or fabric glue, depending on your project.
- Test the patch before attaching it to an expensive garment.
Tattoo-style skull embroidery for jackets and streetwear
Tattoo-style skull embroidery is a strong option for people who like dramatic clothing, biker aesthetics and bold personal style. Roses, knives, decorative outlines and skulls create a more fashion-oriented look than classic Halloween embroidery.
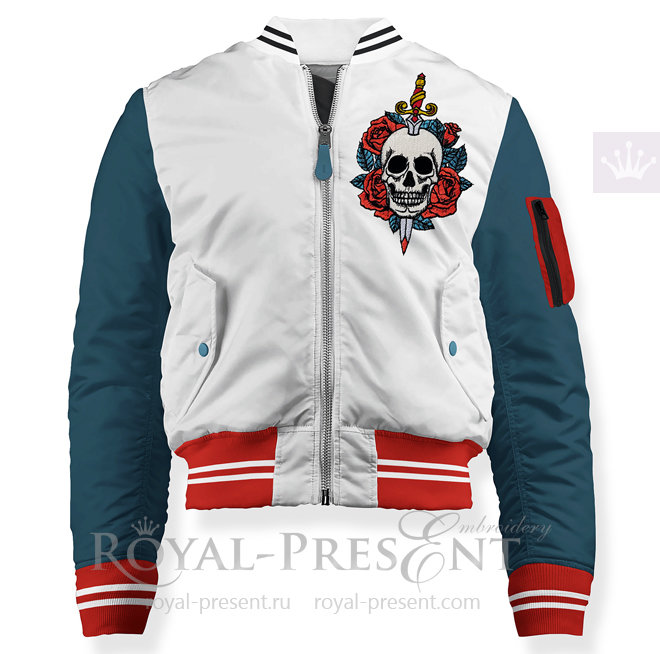
Tattoo Skull Machine Embroidery Design
This type of design is perfect for bomber jackets, denim vests, tote bags, patches, hoodies and statement clothing. It is not only seasonal Halloween embroidery; it can be used all year round for people who love tattoo art and bold fashion.
Spider web embroidery for Halloween home decor
Spider webs are one of the easiest ways to make a project look Halloween-ready. You can combine the skull design with spider web corners, Halloween lettering, bats, pumpkins or black widow spiders.
Spider web corners are especially useful for pillow covers, napkins, placemats, table runners and wall hangings. They frame the textile and create a finished decorative composition.
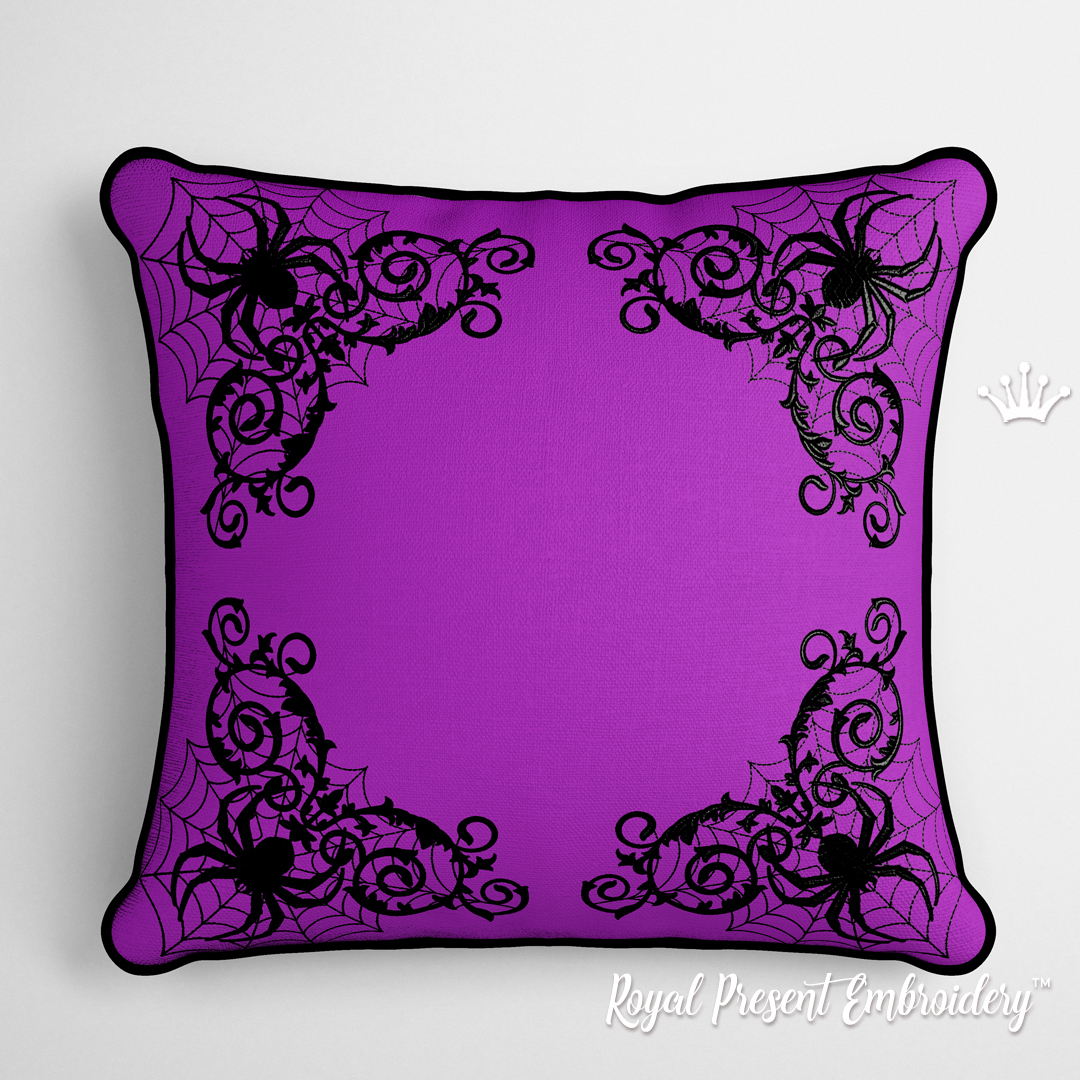
Swirly Halloween Spider Web Corner - 3 sizes
A skull in the center and spider web corners on the edges can create a complete Halloween set: pillow, table runner, placemat or wall panel.
Watch the stitchout video before embroidery
If a product page includes a stitchout video, it is a good idea to watch it before starting your project. A video helps you understand the stitch order, density, thread effect and final look of the embroidery.
This is especially helpful for large skull designs, because you can see how the web lines, eye areas and ornamental details build during stitching.
Open the Halloween Skull in Web product page and watch the stitchout video
Best fabrics for skull embroidery
Skull embroidery usually looks best on fabric with enough body to hold the stitches. Choose the fabric according to the final project.
- Burlap: great for Halloween placemats and rustic table decor. Use water-soluble topping.
- Canvas: excellent for tote bags, banners, wall hangings and patches.
- Denim: perfect for jackets, vests and streetwear projects.
- Cotton: good for towels, aprons, napkins and simple home decor.
- Sweatshirt fabric: suitable for hoodies and men’s clothing. Use cut-away stabilizer.
- Felt or twill: useful for embroidered patches.
- Dark linen: elegant for gothic pillows and dramatic home decor.
For textured fabrics such as terry towels, fleece, velvet or burlap, use water-soluble topping on top of the fabric. This keeps the embroidery stitches clean and visible.
Thread color ideas for Halloween skull embroidery
You can completely change the mood of a skull design by changing the thread color.
- Black thread on white fabric — classic Halloween contrast.
- White thread on black fabric — clean gothic look.
- Gold thread on black fabric — luxury skull style for clothing.
- Silver thread on dark navy or charcoal — elegant dark decor.
- Red and black — dramatic tattoo-inspired look.
- Glow-in-the-dark thread — perfect for Halloween bags, pillows and party decor.
If you use metallic or glow-in-the-dark thread, reduce the embroidery speed and test the design before stitching on the final item.
Halloween Skull in Web Machine Embroidery Design - color chart, medium size
Machine embroidery size and hoop tips
This skull design is available in several large sizes, so check your hoop before purchasing or stitching. Large skull embroidery needs enough space around the design so the web and ornamental details do not look squeezed.
- Check the design size before hooping.
- Make sure your embroidery machine supports the selected hoop size.
- Do not resize a dense design too much without stitch recalculation.
- Use strong stabilization for large embroidery designs.
- Test stitch before embroidering on expensive fabric or ready-made clothing.
If you are not sure which hoop size your machine supports, check your machine manual before downloading the design to your USB stick.
How to combine skull embroidery with other Halloween designs
A skull design can become the central element of a larger Halloween embroidery set. You can combine it with spider webs, pumpkins, bats, skeleton hands, Halloween lettering or corner designs.
- Use a skull in the center of a placemat and spider web corners around it.
- Add Halloween lettering above or below the skull for a party banner.
- Use skull patches on bags and smaller spider designs on pockets.
- Create a matching set of Halloween towels with skulls, bats and pumpkins.
- Make dark decorative pillows using skulls and web corners.
For more matching motifs, browse: Halloween Embroidery Designs and Skulls and Skeletons Machine Embroidery Designs .
Machine embroidery formats and download help
Royal Present Embroidery designs are digital machine embroidery files. After purchase, download the ZIP archive, unzip it and choose the correct format for your embroidery machine.
Common embroidery formats include PES, DST, JEF, EXP, HUS, VP3 and others. If you are not sure which format your machine uses, read our guide: Embroidery Machine File Formats .
If you cannot open the downloaded ZIP archive, use our free online tool: Online ZIP Unzip Tool .

Halloween Skull in Web Machine Embroidery Design - color chart, large size
FAQ about skull machine embroidery designs
Can I use skull embroidery only for Halloween?
No. Skull embroidery is perfect for Halloween, but it also works for men’s clothing, biker-style patches, gothic home decor, rock fashion, denim jackets and tote bags.
Can I embroider this design on a hoodie?
Yes. Use cut-away stabilizer for sweatshirt fabric and make sure the design size fits your hoop and garment placement.
Is this skull design good for placemats?
Yes. It is a strong choice for Halloween placemats, especially on burlap, canvas, dense linen or cotton fabric.
Can I use glow-in-the-dark thread?
Yes. Glow-in-the-dark thread can create a very effective Halloween look. Test first and reduce the machine speed if needed.
Can I make a patch from this skull embroidery design?
Yes. Stitch it on twill, felt or patch fabric, then attach it to a jacket, backpack, hoodie or biker vest.
Where can I find more Halloween embroidery designs?
Visit our Halloween Machine Embroidery Designs category.

Author: Ludmila Konovalova
My name is Ludmila Konovalova, and I lead Royal Present Embroidery. Embroidery for me is more than a profession; it is a legacy of my Ukrainian and Bulgarian heritage, where every woman in my family was a virtuoso in cross-stitch and smooth stitching. This art, passed down through generations, is part of my soul and a symbol of national pride.
Date: 29.09.2018

 Get Sign-In Link
 Login with Google
 Login with Facebook
 Login with Amazon
 Login with Paypal