When describing DIY children’s wear, attributes as “cute”, “frugal” or at best “artisan” come to minds of most. And these “positive” make-ups are used only for casual everyday wear which don’t require specialty trimmings or other decorative flounce. Smart homemade children’s clothes, on the other side, like ones worn for christenings, Easter Sunday church services or less formal birthday parties, are seldom granted uplifting descriptions like these.
Usually smart DIY-s are near the mediocre descriptive line. What is the main drawback, that “drags” DIY children’s fashion to the depths of the “awkward”, “tacky” and “unkempt”? Well, the answer is simple: poor finishing of details is usually what takes the blame. To right the all-too-common wrong, Royal Present Embroidery offers Rococo Buttonholes Machine Embroidery Designs. Exquisite and lavishly chic, these buttonhole embroidery pattern turn “poor” finishing into regally elegant with style!
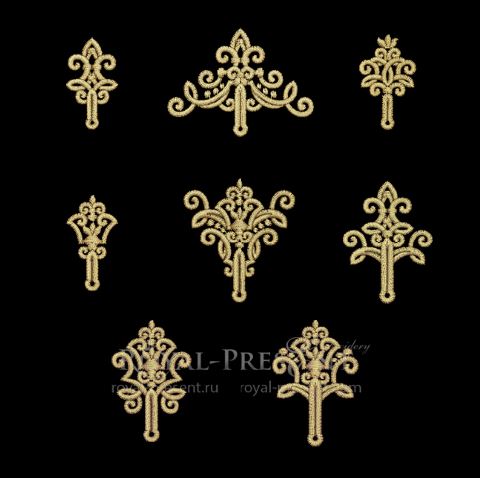
Rococo Buttonholes Machine Embroidery Designs

Formats: .dst, .jef, .pec, .vip, .hus, .pes, .exp, .sew, .dat, .vp3, xxx
Give you for DIY smart children’s wear professional trimming with Rococo Buttonholes Machine Embroidery Designs. Clothes with Rococo buttonholes will make little girls and boys look sharp and stylish. With so many variations available, Rococo buttonholes can be used in creation of any piece of the smart children’s wear. Is your baby-girl about to don her first flower-girl title? Such occasion calls for a special dress with extra spruce everything, including the buttonholes. Are there a series of children parties, where the dress-code should be up to a par? Outfits with exquisite Rococo buttonholes will make your little ones look sharp and chic.
Another good use for these beautiful buttonholes is in the décor of specialty clothes, like the ones required during baptisms and christenings. We don’t particularly say that Rococo buttonhole patterns belong to christening machine embroidery designs collection, but their elevated feel tunes so well with the “divine” theme. Christening gowns for girls with closures accentuated by Rococo stylization will look upscale and chic. Work them in white, gold or pink to highlight your little princess’ adorable charm. For boys, these exquisite buttonhole patterns can be done in white, silver or blue. Christening suits for boys with buttonholes being done in refined Rococo style will make sensational addition to the theme of the day. Any attribute of your precious baby’s special occasion wardrobe can don some of Rococo style.
Tip: For more inspirational christening machine embroidery designs go to our collection of religious and inspirational patterns. Heirloom christening embroideries, christening crosses and sweet little angels – this collection can offer you wonderful accompaniment to Rococo Buttonholes Machine Embroidery Designs.
Now that we elaborated on “where” Rococo Buttonholes can be used, let’s speak a bit more on “how” to work with the patterns.
We, here at Royal Present Embroidery, always strive for our clients’ best interest regarding both the quality of our designs and their implementation in various decorative projects. Rococo buttonholes are no exception from this rule. On this wise we invite you to read a simple step-by-step instruction of how to use these exquisite buttonhole patterns on a christening suit for boys. We’ll be describing the process of making buttonholes on the front of a shirt. Same method can further be used for buttonholing vests, cuffs and other parts of outwear of various types.
For your convenience we’ve divided the information into several blocks:
1 – Gathering of the supplies;
2 – Placement of the designs (including their positioning and spacing);
3 – Hooping;
4 – Embroidering;
5 – Opening of the embroidered buttonholes.
So, shall we begin?
We’ll start with the Gathering of the supplies. For the Rococo project you’ll need:
– Printed and cut-out templates of Rococo Buttonholes Machine Embroidery Designs.
– A shirt or a vest (obviously),
– Stabilizers. For embroidering Rococo buttonholes we suggest using a medium-weight tear-away backing paired with temporary spray adhesive. Remember, use only good quality adhesives, otherwise there’s a chance of damaging both your project and the machine. We, for once, prefer using Gunold KK 100, but any other good quality brand will do the job. If you’d like to avoid using spray adhesives all together, opt for self-adhesive tear-away stabilizers (Madeira Sticky, Stick N Peal by World Weidner etc.). Another option is a water-soluble variation of stabilizer, either self-adhesive (Wet & Gone Tacky Stick-On) or plain.
– Measuring tool (a ruler), for spacing and placing of your buttonholes.
TIP: There’s also a really neat little gadget, which can make buttonhole-spacing way easier. It’s called Simflex tool (Simflex expanding sewing gauge). Look it up online or find a similar one to make buttonholing plain sailing.
– Embroidery threads (rayon or poly) and needles 71/11 sharp,
– Textile marker (for spacing and hooping),
– Two pins and a pair of scissors.
We’ve gathered up the supplies – check. Now let’s proceed with the description of how Rococo Buttonholes Machine Embroidery Designs are worked onto a garment.
2. Placement of the designs.
2.1 – Making a guideline for Rococo Buttonholes placement. Using a temporary textile marker draw a line along the edge of the front of your vest/shirt. This line should be drawn at a distance no less than 0.5 mm from the edge.
2.2 – Spacing Rococo buttonholes.
Place the cut-out template on the area to get a general idea of how many repetitions will you need for the garment. A christening vest for children usually needs 3 buttonholes. With a christening shirt the number will vary according to its cut.
NOTE: If, besides Rococo buttonholes designs, you’re planning on applying other christening machine embroidery designs on the garment, make sure they don’t interfere with each other.
2.3 – After you’ve figured out the approximate number of buttonhole repetitions, space them at the same distance from each other. You can use any of the measuring tools available. Mind that with shirts buttonhole spacing should start from the mid-chest area (the first buttonhole should be marked in this area).
NOTE: Buttonholes at the collar and at the bottom aren’t spaced like the rest. These buttonholes are last in the spacing order, so they take their position according to the space available.
2.4 – Mark the measured for the buttonholes spaces on the pre-drawn guideline. Use the textile marker.
You garment now should have one vertical guideline with several horizontal lines (spacing marks) crossing it at even distances.
2.5 – Place your cut-out template on each of the “horizontal spacing marks” and trace its axis points onto it. Remover the template and cross the points. The crossarrow will be your coordinators during the hooping process.
3. Hooping.
As buttonholes are usually placed relatively close to the edge of the garment, it can cause certain problems with hooping (e.g. the cut might not be able to fit into the hoops that you’ve got). With the smaller items like children’s wear such “difficulties” are more common than not. To avoid them, we’ll be using “floating” technique, where the garment isn’t hooped but attached to the hooped stabilizer.
3.1 – Hoop the stabilizer. If it’s a self adhesive one, remove the coverage to reveal the adhesive layer.
3.2 – Draw vertical and horizontal axis on the stabilizer. You need these axis lines for easier centering of the fabric in the hoop.
3.3 – If it’s not self-adhesive, apply temporary spray adhesive.
3.4 – Smooth your item onto the hooped stabilizer.
If the fabric of your garment is textured, you’ll also need to apply a film (light topping) to prevent stitches from sinking into the texture.
4. Embroidering. Embroider as usual. When Rococo Buttonholes machine embroidery designs will be done, remove the excess of the stabilizer and loose thread ends.
Note: When working with buttonholes, it’s vital to always try the patterns on a similar set of supplies before you proceed with embroidering on the garment.
5. Cutting buttonholes.
5.1 – Cut the embroidered Rococo buttonholes with your scissors. To make the cut clean and precise, place pins at each end of the buttonhole. These pins will act as a kind of “shield” from the too deep of a cut.
That’s it! Now you can marvel at the exquisite fruit of your artistic labor!
Conclusion
Created especially for buttons of smaller sizes, Rococo Buttonholes Machine Embroidery Designs besides children’s wear decorations can be used in many other projects too. You need a chic looking garnish for sleeve plackets on your new smart office blouse? Rococo Buttonholes machine embroidery designs will make perfect accent to the clean but stylish business-lady look. Do you want to add an extravagant epoch touch to the closures of your silk pillowcases? Dainty Rococo buttonholes will do the trick marvelously. Maybe you’re looking for an unusual finishing to the wrappings of your next Christmas gifts? An envelope with an intricate Rococo buttonhole design will give your hand-made wrapping a unique and utterly upscale look.
You may also like
Star of David Machine Embroidery Design Judaism Symbol

Author: Ludmila Konovalova
My name is Ludmila Konovalova, and I lead Royal Present Embroidery. Embroidery for me is more than a profession; it is a legacy of my Ukrainian and Bulgarian heritage, where every woman in my family was a virtuoso in cross-stitch and smooth stitching. This art, passed down through generations, is part of my soul and a symbol of national pride.
Date: 11.06.2018

 Get Sign-In Link
 Login with Google
 Login with Facebook
 Login with Amazon
 Login with Paypal