
When talking about decorative themes with Scottish influence, “rustic” or “cozy” is what comes to the mind of most. Surely, up in the highlands, where weathering heights make their own adjustments to definition of fashion and style, “arcadian” and “homey” are in higher demand. Especially with the heart-warming beauty of all those tartan-patterned throws, antler wall accents and pale thistles all over. Yet elegance, refinement and sophistication are rarely parts of this “barnhouse” allure. Today, however, this rustic tradition is about to change. Royal Present Embroidery, with its updated collection of embroidery designs online, infuses an exquisite, regal vein in the favorite Scottish trends. First number in our “royal” list of re-invented motives comes under the name of Golden Thistles Machine Embroidery Pattern. Lavishly rich and luxurious, this gorgeous decorative gem grants a new finer look to Scotland’s beloved flower.
Impeccable in its recherché styling, Golden Thistles embroidery pattern elevates the garden variety weed to the title of an aristocrat. With this completely new, more dignified look, the pattern can make stunning addition to most elegant decorative projects. Embroider golden thistles on a simple blouse or jacket to transform them into smart raiment for the evening outings. Bold references to Jacobean style in the golden herbaceous ornament will add a deluxe touch to any linen set. Table napery set with napkins, decorated with golden thistles, will turn any meal into a deluxe dining occasion. Bed linens with Golden Thistles Machine Embroidery Pattern on will transform the feel of the entire room. In a room, breathing with regal aroma of blooming Scottish uplands, your dreams will become a journey to magical Fairyland.
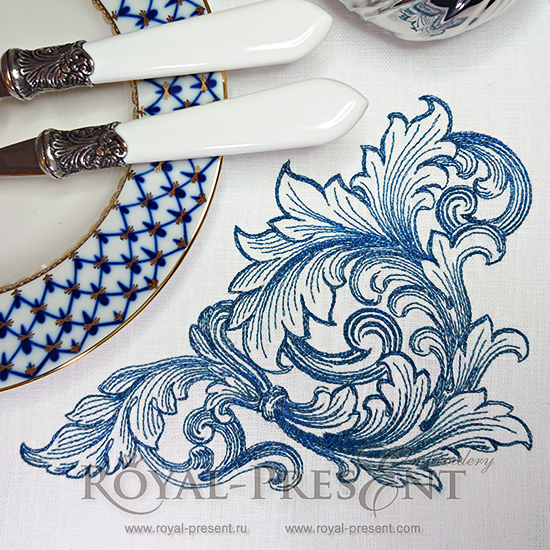
Golden thistles Machine Embroidery Pattern

Formats: .dst, .jef, .pec, .vip, .hus, .pes, .sew, .exp, .dat, vp3, xxx
Take few hours of your time to create bedding set that will grant you an utterly pampering and truly dreamy experience! With three sizes available, Golden Thistles pattern can be applied on pillowcases, sheets and covers of all sizes and shapes. Work it into a magnificent border or use it a single stand-out accent. Whichever of the variants you’ll choose, you’ll be stunned with the results! Download it from our flower and plants collection of embroidery designs online and plant a garden of your dreams and for your dreams!
We know that with a beautiful pattern like this you can’t wait to see its magic in action. But please, hold on to the text little more, as there’s plenty of useful info ahead. Read on as we’re going to take you through every step of the work, explaining how to center, hoop and stitch Golden Thistles machine embroidery pattern. Besides that, we’ll also share some tips on how to pick and otherwise prepare your linens for this kind of project. For your convenience we broke down the whole process into several steps, with the instruction included.
The entire break-down unfolds into 5 main steps:
1 – Gathering of the supplies (plus few tips on the linens in particular)
2 – Preparing the linens for the embroidery.
3 – Creating layout for the embroidery (plus few tips on how to work Golden Thistles Machine Embroidery Pattern into a border).
4 – Hooping.
5 – Embroidering.
Hopefully, after reading all the info further below, you’ll enjoy every step of the embroidery process. So, if you’re ready we can begin.
1 – Gathering of the supplies.
For luxurious Golden Thistles bed-linens set you’ll need:
– An array of linens. Pillowcases, sheets, coverlets – any item can be included into a luxurious bedding set of your dreams.
TIP: When buying items for the set, make sure to acquire an extra pillowcase of the same fabric. This pillowcase will be used for the test embroidery of the pattern as well as adjustment of your machine’s settings (should the need be).
– Golden Thistles Machine Embroidery Pattern and its printed template. Word of advice: print out templates of all sizes to find the perfect match for each of the embroidered-to-be item. If you plan on working the pattern into a border, print out several repeats of each of the pattern to make spacing easier.
– Embroidery threads. For most linens fabric size 40 of the embroidery thread is safe choice. As to the type of the threads, it’s largely up to your preference. We opted for rayon (Madeira Classic), which works fine for most types of textiles. If, however, you’d like use other rayon brands or switch to, say, polyester altogether, you absolute can. This rule applies not only to Golden Thistles Machine Embroidery Pattern, but also to other Royal Present embroidery designs online.
– Embroidery needle. A new sharp (or regular/universal) embroidery needle 75/11 will work with most bed linen fabrics.
– Sewing thread. You might need to cut some seams when embroidering certain elements of your set (e.g. pillowcases’ bands). Make sure to match the sewing thread with the one (ones) that have been used on the seams before.
– Stabilizer. When working on projects with linens, it’s always good to have a clean “back side” of the embroidery. This means that no cut-away backing should be used as this type leaves the known “unsightly” layer. To avoid the issue, you may choose to work:
~ tear-away backing (medium weight Gunold Quick Tear, Madeira Cotton Soft) plus temporary spray adhesive,
~ water soluble tear-away (Sulky Fabri-Solvy fabric-like mesh) plus temporary spray adhesive,
~ water soluble tear-away (Sulky paper-like tear-away) plus temporary spray adhesive,
~ self-adhesive tear-away (Sulky’s Sticky, Madeira Cotton Fix).
– Seam ripper, scissors, measuring tool, an iron and a textile marker.
Now, that you’ve covered the first step, let’s move on to the second one.
2 – Preparing the linens for the embroidery.
2.1 Prewash the linens. Let them dry and iron them well.
Prewashing before embroidery is especially important for the fabrics which have linen in their consistency. This step eliminates puckering, caused by the possible shrinkage of the fabric after its first wash.
3 – Figuring out the layout of the décor.
3.1 Measure your linens to know how many repeats they can fit. Here’re main points to take into account during this stage:
– Take time to find the perfect match between the sizes of sheets/pillowcases and the sizes of the designs.
– Templates (cut-out according to the pattern’s outline) will help you build the layout.
– When creating a border try to avoid stretching too close to both ends of the sheet.
– It’d be easier to create a border with odd numbers of repeats, as it eliminates stress of maintaining the symmetry and spacing right.
3.2 – Using your tool, measure the band where golden thistles machine embroidery pattern will be positioned. The band can also serve as a horizontal axis for the centering of the pattern (or series of patterns, should you choose to embroidery a border).
3.3 – Mark the band (axis) using a marker or just fold the sheet (pillowcase) along the line and press it slightly with an iron. The crease will be your axis.
3.4 – Fold the sheet (pillowcase) vertically to find its middle. Press it slightly. The center of the crossed creases will be the middle point of the border. If you’ll be embroidering only one repeat of the pattern, then this point will be the center of this design.
3.5 – Start arranging designs into repeats from this central point (not from the edge of the sheet). Move along the horizontal crease (axis) towards each of the edges of the sheet. Use measuring tool and cut-out templates to space the repeats.
3.6 – When you’ll know the number of repeats and the size of the spaces between them, start marking the points, needed for the centering of the design (designs) in the hoop. You won’t have any problems with this, as Royal Present Embroidery always pre-marks axis lines on the template images. You’ll only need to trace them from the templates to the fabric with the help of a textile marker.
4 – Hooping.
4.1 – Spray the backing with a temporary adhesive and smooth it onto the fabric. If you use self-adhesive stabilizer, skip the step.
4.2 – Hoop the fabric-stabilizer sandwich squaring the pattern according to the marks that you’ve made. With self-adhesive stabilizer, hoop the stabilizer and “float” the fabric.
5 – Embroider as usual. After the embroidery will be done, clean all the loose thread ends and remove the excess stabilizer.
Working with Golden Thistles Machine Embroidery Pattern, as well as with all our embroidery designs online, is easy and fun. High quality and good applicability of this pattern leaves so much room for its creative application, that the bed-linen set, that you’ve just finished embroidering will surely be only the first number in the long list of Golden Thistles decorative projects.
You may also like
Machine Embroidery Design Vintage baroque ornament

Author: Ludmila Konovalova
My name is Ludmila Konovalova, and I lead Royal Present Embroidery. Embroidery for me is more than a profession; it is a legacy of my Ukrainian and Bulgarian heritage, where every woman in my family was a virtuoso in cross-stitch and smooth stitching. This art, passed down through generations, is part of my soul and a symbol of national pride.
Date: 29.05.2018

 Get Sign-In Link
 Login with Google
 Login with Facebook
 Login with Amazon
 Login with Paypal