Florals, stripes, polka dots – there’re some trends that defy the ever-changing nature of fashion. In print, appliqué and, of course, embroidery, these fashion “heroes” prove season after season, they’re here to stay. So much so, that absence of these patterns makes catwalks feel barren and wardrobes incomplete. Or at least it was so until recently, when everyone who’s anyone’s suddenly taken into entomology.
Channel bees, Gucci swaps, D&G dragonflies – the trend is “buzzing” bigger and louder with each passing season. Now all the fashion-forward gals need also to make room in their wardrobes for, no better way to put it, insects. Thinking of adopting the trend but from its less “shivering” side? Follow the suit of Valentino, Versace and Moschino and fly with beautiful butterflies. Start right now with Machine Embroidery Design Elegant Butterfly. Sweet and tasteful, this pattern will infuse the a-la-mode flair into your garbs with exquisite ease.
Being part of Japanese collection of patterns, Machine Embroidery Design Elegant Butterfly highlights everything that this oriental nation honors in nature. It’s delicate, yet gripping, charming, vivid and oh-so-very lively. Few details highlight the botanical purity of the motive. Its natural charm becomes especially obvious when the design is “dressed” in low-key “earthy” colors. Stitch it in soft-hued cotton embroidery threads on a light summer dress for a fresh, vernal look.
With just more zest added to its color-scheme, elegant butterfly will shift its flair from the East to the West. Embroider colorful butterflies on denim shorts or jeans to enjoy nature’s vibrancy to the full. In golden threads, rayon or metallic, machine embroidery design elegant butterfly will look stunning on a posh evening gown. For such look take inspiration from Valentino or Zuhair Murat and your next evening out will make you a star!
Machine Embroidery Design Elegant Butterfly – 2 sizes

Size: 98.0×86.6 mm (3.86×3.41 “), Stitches: 8559
Size: 54.8×48.3 mm (2.16×1.90 “), Stitches: 4308
Formats: .dst, .jef, .pec, .vip, .hus, .pes, .exp, .sew, .dat, .vp3, xxx
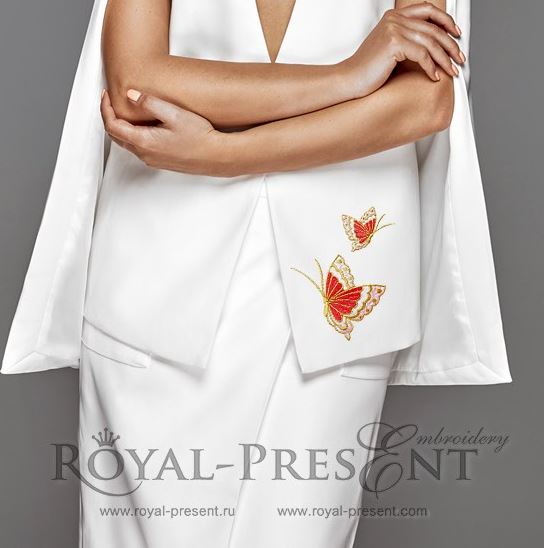
Machine Embroidery Design Elegant Butterfly can be eloquent or minimalistic, delicate or ravishingly eye-catching. Change colors, quality of your threads or work it in various combinations of sizes – you’ll love the creative game that this butterfly offers. Thinking of a project to start with? Go with something that requires the singular charm of this motif the most. How about that part of your wardrobe that stuck with the boring office workwear? A blazer or an office jacket could make perfect canvas for your work! Embroider elegant butterflies on lapels, pocket flaps or side fronts of the pieces and they’ll be instantly revived. If your office dress-code frowns upon such obvious decorations, “sneak” butterflies on the vents of the sleeves. Embroidering on sleeves isn’t difficult and with a quality pattern like this, you’ll enjoy every step of the process.
If you’re interested, then read on. Further you’ll find a step-by-step instruction on how to machine embroider on sleeves using machine embroidery design elegant butterflies. As there’re several methods of decorating sleeves with machine embroidery (embroidery per se, patches, appliqués etc.), we need to make it clear that we’ll be talking about the one which implies stitching of a design directly onto the fabric of the sleeves. In the instruction you’ll learn how to do it in a way, which is accessible even for complete embroidery novices. So, if you’re ready, let’s begin with making sure you have everything that the project requires.
– Jacket/blazer,
– Machine Embroidery Design Elegant Butterfly and its template. If you plan on embroidering several butterflies, make corresponding number of templates. Also, if your project includes mirrored images of the designs, mark the printed templates accordingly. This will help you avoid various mix-ups during both the hooping and the stitching.
– Medium weight cut-away stabilizer.
– Temporary spray adhesive (any good quality brand).
– Embroidery threads. For this particular project we suggest using rayon threads (and not polyester). Fabrics of office jackets (cotton, linen, wool) usually have matte sheen, so shiny polyester threads might look odd on such textiles. Rayon threads have a more “natural”, “organic” sheen, so they’ll match the fabrics better. Another choice for embroidering elegant butterfly patterns could be cotton threads. If you opt for the latter, make sure to check their compatibility as to the thickness of threads. Cotton threads tend to be thinner than rayon ones so make according adjustments with tension and speed of your machine. Now with the brands of the threads. Our choice is Madeira Classic, but you’re welcome to use any of your choice.
– Embroidery needles. Size – 75/11, type – sharp.
– Sewing threads (to sew back the lining and the seams of the sleeves). Color of the threads should match the “original” threads of the seams.
– Scissors or seam ripper, measuring tool, chalk or textile pen.
Got everything that you need? Ok, then, let’s start revamping your jacket.
1 – Positioning of Machine Embroidery Design Elegant Butterfly on the sleeve.
1.1 – Cut-out the templates roughly around the outlines of the butterfly.
1.2 – Place the cut-outs on the sleeves according to your liking. Remember that we’re embroidering on the fabric of the sleeves. This means that there should be no buttons or other obstacles for the needle during its work. If you layout overtakes the area where buttons are sewed, think of removing them before making the final placement decision.
1.3. – Trace the axis lines (given on the templates) onto the fabric. These marks will be useful during the process of hooping. If you’re working with a template of a “mirrored” design, mark the fabric accordingly. Also you need to know where the top of the design is (for proper hooping), so don’t forget to point it out too.
2 – Preparation of the sleeve for the hooping.
2.1 – Turn the sleeve inside-out.
2.2 – Cut the seams on the lining.
2.3 – Cut the seams of the sleeves.
NOTE: We strongly suggest you remove the lining before you proceed with the embroidery. Although it’s possible to embroidery through the lining, it’s highly inadvisable. In case of any misalignment between the two layers of fabric during the hooping, you’ll get such a severe fabric shifting that the entire project will be ruined. Besides, lining offers the neat coverage for the back of the embroidery, which is always a plus. That is why it’s worth keeping the lining intact by removing it before the work and reattaching it afterwards.
3 – Hooping.
As sleeves (the vent part) tend to have buttons, which might interfere with the bands of the hoop, we’ll be using floating technique.
3.1 – Hoop the stabilizer.
3.2 – Apply temporary spray adhesive onto the stabilizer.
3.3 – Smooth the fabric of the sleeve onto the stabilizer.
If the sleeve of your jacket is button-less, just hoop it together with the stabilizer. Don’t forget to use temporary spray adhesive too.
4 – Embroidery.
4.1 – Embroider as usual.
4.2 – After the embroidery is done, cut all the loose threads and the excess stabilizer.
5 – Re-assembly of the sleeve.
5.1 – Change the embroidery threads to the sewing ones and sew the seams of the lining and the sleeve back on.
Now, after all the work’s done, it’s time to marvel at the elegant fruit of your labor. Stylish makeover of clothes isn’t the only area of expertise of machine embroidery design elegant butterfly. In interior decoration such beautiful pattern can be used on accent pillows, table-top covers, and adornment of window treatments. In household items terrain, elegant butterfly can fly through various sets of linens and bathroom accessories. Ideas of its possible applications of are endless. Get inspired, get creative and enjoy every bit of your decorative journey!
You may also like

Flower bicycle Machine Embroidery Design – 5 sizes

Author: Ludmila Konovalova
My name is Ludmila Konovalova, and I lead Royal Present Embroidery. Embroidery for me is more than a profession; it is a legacy of my Ukrainian and Bulgarian heritage, where every woman in my family was a virtuoso in cross-stitch and smooth stitching. This art, passed down through generations, is part of my soul and a symbol of national pride.
Date: 19.05.2018

 Get Sign-In Link
 Login with Google
 Login with Facebook
 Login with Amazon
 Login with Paypal