Good quality clothes make big part of a stylish look. Most people probably know that such quality is all about details: the cut, the matching of the fabric pattern, the zippers, the seams. The lists of such are cited over and over again in all fashion blogs and magazines. Some lists have different order or even features, but there’s one requirement that’s always there – a nicely stitched buttonhole. A garment, after all, is as good as its buttonholes, because they aren’t simply utile attributes of your clothes. If done correctly, buttonholes can also be a telltale accessory of your style.
On this wise we’d like to introduce our new collection of embroidery designs for buttonholes. Exquisite, elegant and chic, patterns of this collection are of the top notch class. Each of them boasts of great functional and decorative virtues – real treat for anyone who values good quality in clothing. Start exploring what luxury style truly means with Machine Embroidery Designs Baroque Buttonholes. Infused with finest French fashion tradition, these little things will add polished feel to your clothes and style.
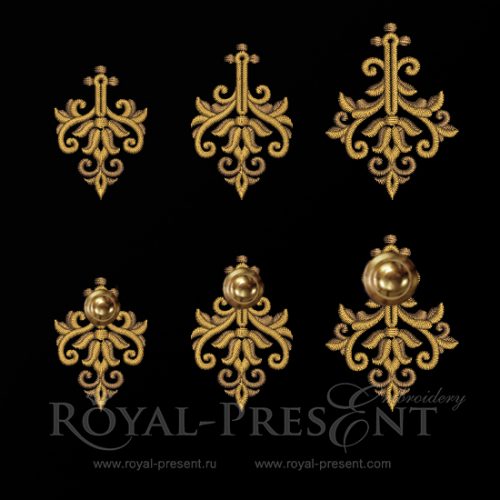
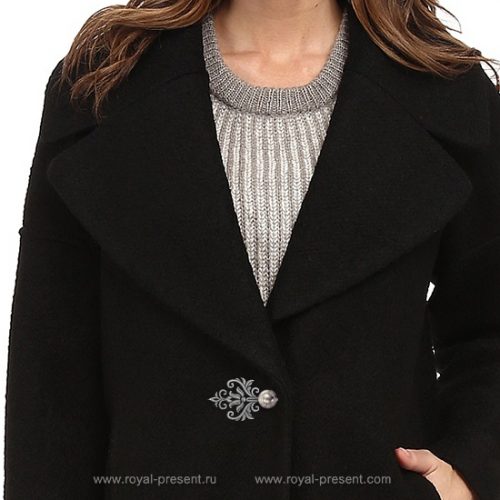
Elaborate, lavish and utterly enticing, Machine Embroidery Designs Baroque Buttonholes will make any garment look like an haute couture article. Baroque Buttonholes come in three different sizes, meaning that they can be used both on fronts, sleeve plackets and cuffs. Be it jacket, a blazer or a trench – these decorative buttonholes can find their places on any type of outerwear. Besides garments, these designs can be used for creating closing for decorative pillows, bags, clutches and other accessories too.
Depending on the type of threads, you can up or down the ritzy effect of these buttonholes designs. For example, when embroidered in rayon or polyester treads, Baroque buttonholes will look smartly chic. You can use any brand of such threads – Sulky, Gunold, Madeira or other. Besides rayon and polyester, Machine Embroidery Designs Baroque Buttonholes can be stitched with metallic threads as well. Stylized buttonholes, embroidered in golden, silver, bronze or sparkly colors of other shades will up the feel any textile piece.
Machine Embroidery Designs Baroque buttonholes

Formats: .dst, .jef, .pec, .vip, .hus, .pes, .exp, .sew, .dat, .vp3, xxx
Tip: If you haven’t yet worked with metallic threads, a good brand to start with could be Madeira. Smooth Madeira Metallic FS # 50 is advertised to behave in embroidery just like rayon on polyester threads (Madeira Classic #. 60 and Madeira PolyNeon #. 60). Try your hand with FS # 50 Gold 4 (5004) and Gold 3 (5003) for stunning Baroque buttonholes. NOTE: While qualities of the thread are similar to those of rayon or polyester, needles for their use should be used just like with any other metallic thread. Needle thread tension as well as the speed might need to be adjusted accordingly.
Now, as our discussion of threads touched upon the technical part of embroidering baroque buttonholes, let’s move further on, covering other related to the topic details.
Machine Embroidery Designs Baroque buttonhole placement
There are certain rules for buttonhole placement on garments of ladies and gentlemen. Ladies’ garments with center front buttons should have them (the buttons) placed on their left-hand side. Buttonholes, obviously, should go to the right-hand side. With gentlemen’s garments everything is vice versa, which means that buttonholes should be on the left-hand side. Now, when working with Baroque buttonholes, the rule will be exactly the same. Then only thing that one will have to do when working with clothes of different types, is to “mirror” the design on your embroidery machine and apply it accordingly.
There’s also another thing that might be of issue when finding “proper” placement of Baroque Buttonhole designs. As there’re various shapes of buttonholes, some of them could be used either vertically or horizontally. Baroque buttonholes have the shape of a keyhole, which on garments could be placed only horizontally. Should you choose to use this design for embroidering on other textiles, like decorative pillows, bags etc., you might position it as you see fit.
Preparation for Baroque buttonhole design application
1 – One of the most important things to remember, when preparing to stitch any buttonhole on your sewing or embroidery machine, is to try it out on a similar to the actual project materials.
2 – Think through the decorative part: how many buttons will you need, what should be their sizes and so on.
Machine Embroidery Designs Baroque buttonholes
Tip: When making buttonholes for a shirt, take into account the bust points and the waist. Think, how will the buttons “close” difficult areas when you’ll move?
3 – As part of the preparation, it would be helpful to use printed templates of Baroque buttonhole designs in various sizes. As the design is more elaborate than the plain buttonhole, you will need to see how its ornaments look on your project. Templates are the best thing for such job. Cut the templates roughly around the designs for better precision
Now that you’re prepared, let’s get down to the actual stitching.
Stitching Baroque buttonholes designs
List of the needed materials:
– Stabilizers. Medium-weight tear-away backing is the most common choice of stabilizers, used for buttonholes. If you’d like, you can opt for a water-soluble variation (Madeira Avalon, Sulky Solvy). Such water-soluble films might also be required if the fabric that you’re working with is too delicate, stretchy or textured. For example with velvet, such water-soluble film doubles as topping and backing.
– Temporary spray adhesive,
– Measuring tool (a ruler), for spacing and placing of your buttonholes,
– Threads and according needles,
– Textile marker or chalk,
– Printed templates of machine embroidery designs baroque buttonhole
– Two pins and scissors or seam ripper,
Now let’s start embroidering
1 – Mark a parallel line along the edge of the needed side of the garment. This line will help you place the designs evenly along the length of your garment.
2 – Space your designs with the help of your measuring tool. Use templates for an approximate spacing first. Mark the measured spaces with lines.
Now you have one vertical line along the hem of one of the sides of your front, with several horizontal ones. Points where the horizontal lines cross the vertical one will help you find centers of future embroideries. NOTE: we mean not center of the buttonholes, but centers of the designs.
3 – Mark the center of your design on the horizontal line, using the template.
4 – Hoop the stabilizer and mark on it the vertical and horizontal axis to find the center.
5 – Spray temporary adhesive onto the stabilizer.
6 – Adjust the garment to the stabilizer, aligning them according to their marked centers.
If your fabric is delicate, at that point you can add water-soluble topping.
7 – Embroider.
8 – After the embroidery is done, remove the stabilizers and loose thread ends.
9 – Cut the buttonholes open with the help of your seam ripper or scissors. To avoid cutting through the ends of your buttonhole, place pins at its each end.
The describe method is used when making buttonholes for projects where there should be used several designs. If you’ll need to embroider only one buttonhole, skip steps 1 and 2 and start with the step 3.
You may also like

Machine Embroidery Design Baroque Split Name Frame

Author: Ludmila Konovalova
My name is Ludmila Konovalova, and I lead Royal Present Embroidery. Embroidery for me is more than a profession; it is a legacy of my Ukrainian and Bulgarian heritage, where every woman in my family was a virtuoso in cross-stitch and smooth stitching. This art, passed down through generations, is part of my soul and a symbol of national pride.
Date: 02.04.2018

 Get Sign-In Link
 Login with Google
 Login with Facebook
 Login with Amazon
 Login with Paypal