Fashion is what makes our style. It transforms, improves and beautifies each and every little thing about our outfits, influencing our look in a much greater way than we think. What once was just a protection from the elements has been turned by the fashion into an expression of style. What once was used for purely functional purposes today became an indication of elegance and chic. Fashion made every little detail matter: from the fabric and the amount of stitches per inch to buttons and even buttonholes. Yes, truly elegant person has to pay attention even to such fine points as buttonholes. We know most do, that’s why we enhanced our collection of buttonholes designs with a new particularly refined installment. Make finesse your ally by tailoring fashion to fit your unique style with our new machine embroidery designs buttonholes.
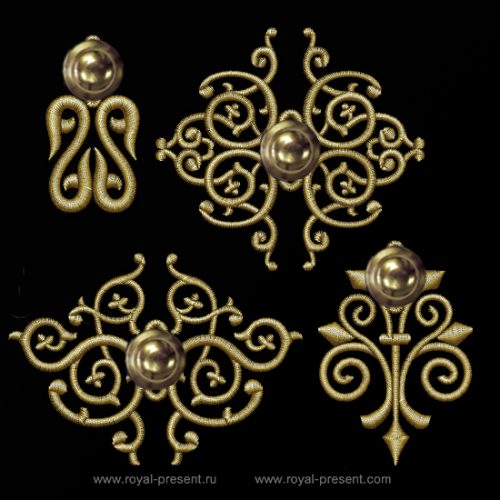
Machine Embroidery Designs Buttonholes

Formats: .dst, .jef, .pec, .vip, .hus, .pes, .sew, .exp, dat, .vp3, xxx
Exquisite and oh-so-very chic, these decorative embellishments for buttonholes will elevate your garments to a higher level of perfection. Consisting of four stunning exemplars, this set of buttonhole designs is done to accommodate the most commonly used sizes of a button – 24L and 22L. Buttons of this size are usually used for closures of vests or jackets’ sleeves. However, this rule applies only for “the most boring†formal dress-code. That’s why within frames of decorative projects, they can be used in most places and most types of wear. Further we’ll speak in detail about possible applications of this set of designs.
Machine Embroidery Designs Buttonholes decorative applications
The whole quartet of motives boasts of uniquely designed filigree of curved lines, loops and ringlets. Infused with French finesse and oriental opulence these buttonhole designs gracefully intertwine pizzazz and sophistication. Such whimsical combination will look gorgeous on garments for special occasions, smart accessories and other ritzy gear.
Designs of the whole buttonhole set share the same ornamental theme. Such a convenient feature allows using their various combinations in the same piece of clothing. For example you can use one of the smallest patterns for buttonholes on a jacket’s sleeve vents with one of the bigger patterns being used on the jacket’s front.
With artful designs like these all your smart vests, chic trousers, shirts, dresses and other pieces of clothing can don lavish flair of embroidered buttonholes.
Besides buttonholing of garments, machine embroidery designs buttonholes can be used in interior decoration too. Throw pillows of various types, shapes and forms, can all be embellished with decorative buttons and elaborate buttonholes.
How to work with machine embroidery designs buttonholes
First let’s talk about the threads.
With the exception of wool, any type of threads (rayon, polyester, metallic ones) could be used with this set of designs. Wool (acrylic) threads might be too thick for the delicate lines of the patterns. We tested all the designs of the set with the help of Madeira Classic, thread No 1064 (Daffodil). If your choice of thread brand differs from ours, you can look up the needed substitution in one of the online thread information charts. With the help of these online charts you can change colors or swap rayon for poly or vice versa. Such charts are either provided by threads manufacturers or various craft-oriented sites, and usually are free of charge for the use.
Now let’s speak a bit more about embroidering buttonholes with metallic threads. For better results, we suggest opting for metallic threads of finer texture. Madeira Metallic FS # 50 is a great example for once, but as always, you can freely change the brand to one of your favorites. Make sure, however, to make test embroidery before embarking on the actual project.
To make embroidering with metallic threads easier, we’ve gathered some pretty handy tips and tricks. Feel free to use them when working on embroidering of your buttonholes.
Metallic threads troubleshooting
If you experiencing such problems as kicking, breaking, twisting etc., of your metallic threads during embroidery, these could be the possible solutions:
– Lubricate your threads with silicon (Silicon Extra, Silicon Spray by Sprayway) or wax (Hemline) to make it more pliable.
– Lower the speed of your stitching.
– Lower the thread tension.
– Change the needle, because it might have become dull.
– Change your stabilizer. If you’re embroidering on a self-adhesive (sticky) stabilizer, the glue layer might gum up the needle, which in its turn might cause thread breakage.
– Cover your cone with a thread net. Usually you’ll want to use a thread net with cones of smaller sizes or the ones, with half (o less) volume of the remaining thread on. Such peculiarity might be explained by the fact that while unwinding from spools of smaller diameters, the thread tend to over-twist, which might cause the breakage. Thread net prevents the over-twisting of the thread.
– Use a secondary thread holder. When the spool is positioned further from the embroidery machine, the thread has a longer way to cover before entering the thread path on the machine. Making the thread to travel from a farther distance might help to reduce the twisting.
– Use a Styrofoam peanut (the ones that is used in packing). The thread should come thought the peanut before entering the thread guide on your machine. You can position the peanut right on the thread guide, pressing it slightly into the metal part, or adjusting in with the help of a double-sided sticky tape. To pass the thread through the foam peanut, you can use a regular sewing needle.
The next step
Now that the subject of threads for machine embroidery designs buttonholes is covered, you need to sort all your stabilizers, needles and hooping techniques. We’ve spoken in detail on the matter here, (link to Machine embroidery Designs Baroque Buttonhole) so if you’d like you could find there all the relevant information as well as a detailed plan of placing, spacing and embroidering buttonholes on garments.
Read this BEFORE you start embroidering buttonholes
Making good-quality decorative buttonholes has to do not only with their placement or the way you “organize†stitches. Along with those things, the actual “opening†of the buttonhole matters greatly as well. How you cut the hole might influence the way the fabric behaves afterwards. So if you want to enjoy the long-lasting good look of your buttonholes, you should work some extra “magic†into the making process. Let’s read about the extra “magic†in the tailor tip, given below.
Tip on buttonhole making
The tip is quite simple, really. All you need to do is BEFORE opening a buttonhole, apply a seam sealant on the fabric inside the buttonhole space. When applied, the sealant glues the fibers in the fabric, making them sturdier and thus less susceptible to fraying. The stuff is available in most craft shops, as well as craft sections of major supermarkets. Most common ones will be Stop Fray by Yarn Tree, Stop Fraying by Aleenes, Frey Check by Dritz.
Note: All the mentioned seam sealants are liquids, as it’s more convenient to target a small area of a buttonhole with a liquid dispenser. However, besides liquids, there’re also seam sealants available in the form of spray (Sullivans Fray Stop Spray). Sprays have same formula and are used in making patches or appliqués.
How to use a seam sealant in buttonhole making
1 – Squeeze a drop of a seam sealant liquid on a piece of paper. Do not apply the liquid directly on the area of the fabric. With buttonholes being so small, you might not be able to achieve the needed precision.
2 – Dip a toothpick or a pin in the drop and run it over the needed area of fabric (the area inside the buttonhole).
3 – Let the fabric dry (5-10 min).
4 – Cut the buttonhole as usual.
You may also like
Canadian flag skull Machine Embroidery Design

Author: Ludmila Konovalova
My name is Lyudmila Konovalova, and I lead Royal Present Embroidery. Embroidery for me is more than a profession; it is a legacy of my Ukrainian and Bulgarian heritage, where every woman in my family was a virtuoso in cross-stitch and smooth stitching. This art, passed down through generations, is part of my soul and a symbol of national pride.
Date: 09.03.2014

 Get Sign-In Link
 Login with Google
 Login with Facebook
 Login with Amazon
 Login with Paypal